> ## Documentation Index
> Fetch the complete documentation index at: https://docs.kibocommerce.com/llms.txt
> Use this file to discover all available pages before exploring further.
# Configure Inventory
You must enable inventory at the location level before you can begin to associate products with inventory.
Get an introduction to inventory management in Kibo
Note that changes to these settings may not immediately take effect when processing orders. It may take up to 15 minutes for updates to be reflected in the system while the cache refreshes.
## Enable Inventory
You must enable inventory support for one or more of your locations and then enable products for stock tracking before you can create inventory records and set quantities.
To enable inventory support for a location:
1. Go to **Main** > **Orders** > **Locations**.
2. Click a location to open its configuration details.
3. Under the **Location** section, enable **Location supports inventory**. 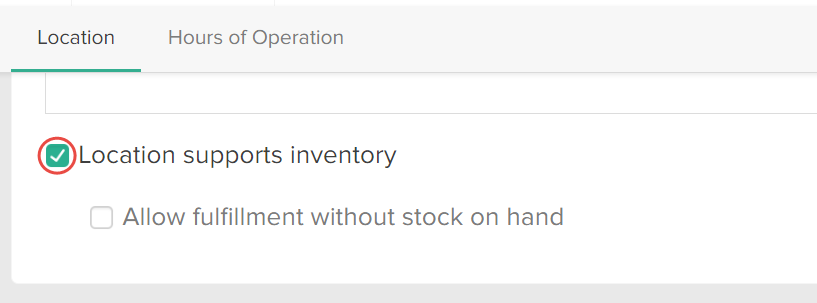 4. (**Optional**) Decide whether you want to **Allow fulfillment without stock on hand**.
This allows you to fulfill orders without sufficient on-hand quantities. This is useful if you want to mark items as fulfilled before entering newly arriving stock quantities in Kibo eCommerce. Refer to [Fulfill Items Without Sufficient Stock](/pages/fulfill-items-without-sufficient-stock) for more information.
5. Click **Save**.
To enable inventory for a product in the catalog:
1. Go to **Main** > **Catalog** > **Products**.
2. Click a product to open its configuration details.
3. Go to **Product Editor** > **Inventory** and enable **Track stock level**. 4. Click **Save**.
Note that if you click **Manage Inventory** in the product configurations shown above, you will be taken to the Inventory UI filtered to that product. If it's a configurable product with options, then the base product code will be used.
## Create Inventory Records
**Note:** The Inventory UI has been updated with a new look and feel and new functional changes, and has been renamed to **Supply/Demand UI**. Contact [Kibo Support](https://help.kibocommerce.com/) to opt in and begin using it. All sandbox tenants will receive the new UI on July 21. Select the tab below based on which UI your tenant is currently using.
You can create inventory records and set quantities from the Inventory UI.
1. Go to **Main** > **Orders** > **Inventory**.
2. Click **Create New Inventory**. This will add an empty row to the table.
4. Click **Save**.
Note that if you click **Manage Inventory** in the product configurations shown above, you will be taken to the Inventory UI filtered to that product. If it's a configurable product with options, then the base product code will be used.
## Create Inventory Records
**Note:** The Inventory UI has been updated with a new look and feel and new functional changes, and has been renamed to **Supply/Demand UI**. Contact [Kibo Support](https://help.kibocommerce.com/) to opt in and begin using it. All sandbox tenants will receive the new UI on July 21. Select the tab below based on which UI your tenant is currently using.
You can create inventory records and set quantities from the Inventory UI.
1. Go to **Main** > **Orders** > **Inventory**.
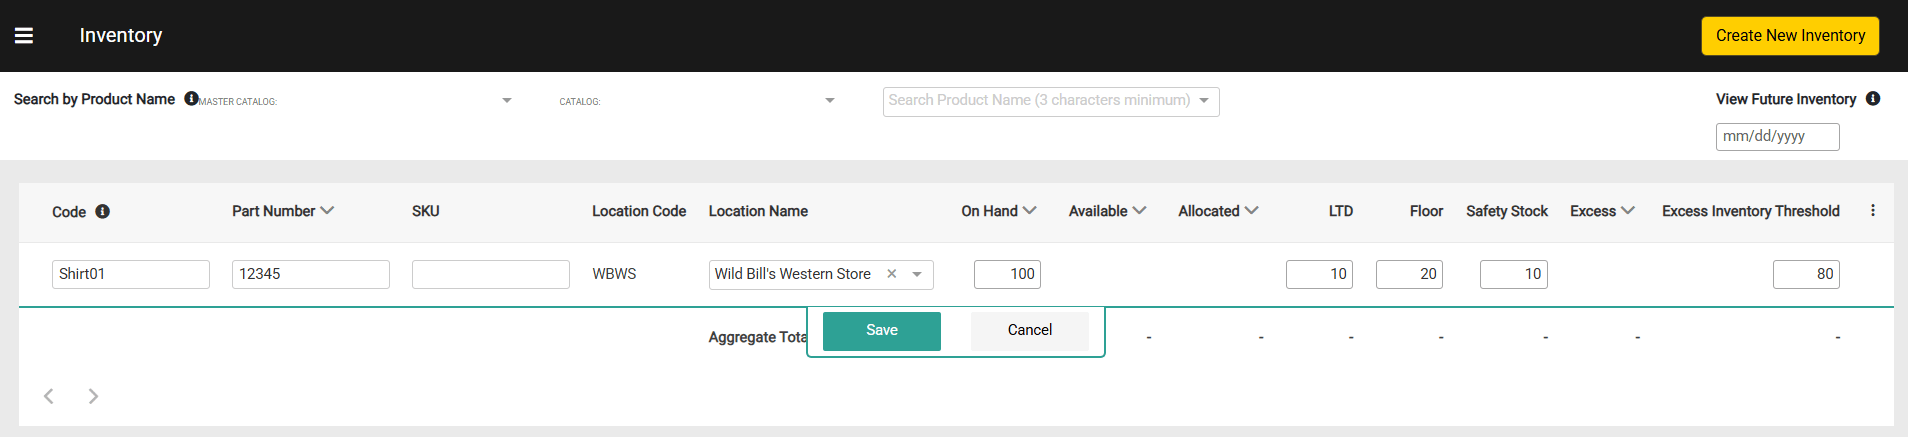
2. Click **Create New Inventory**. This will add an empty row to the table. 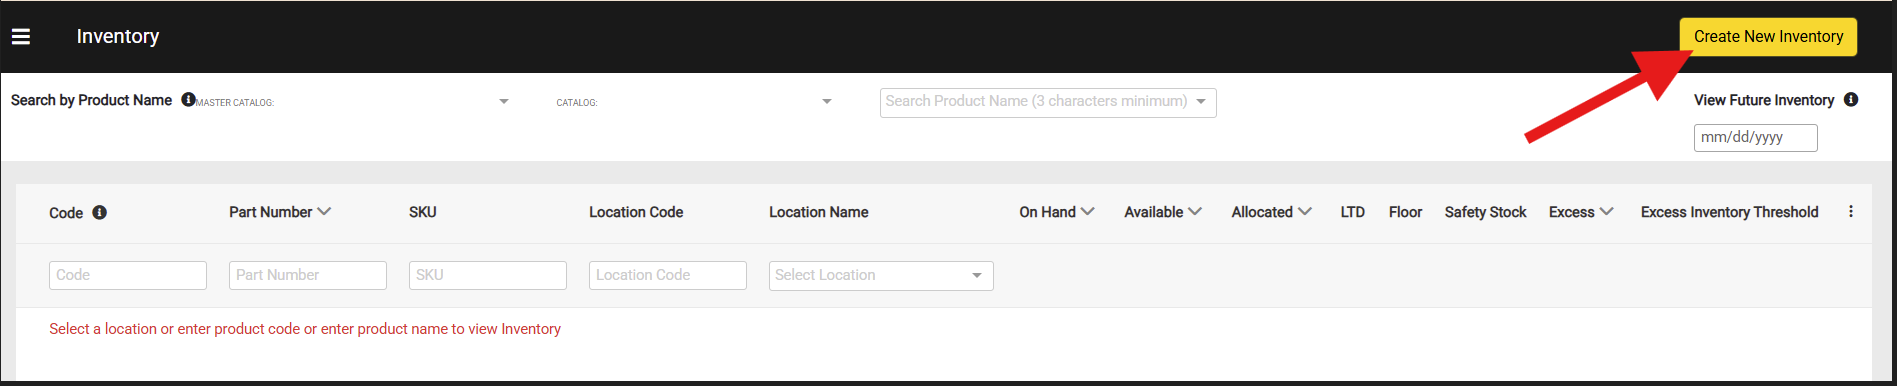 3. Enter a product code and select a location, then enter the On Hand and any other inventory values you want to include such as LTD, Floor, Safety Stock or Excess Inventory Threshold. The below example shows a basic inventory record without additional [granular inventory fields](/pages/granular-inventory-fields "Granular Inventory Fields") or [tags](/pages/inventory-segmentation-overview "Inventory Segmentation Overview").
 If you want to set Safety Stock levels automatically upon inventory refreshes, based on criteria such as product types and location groups, you can use [Safety Stock Rules](/pages/safety-stock-rules "Safety Stock Rules").
4. Click **Save**.
1. Go to **Main > Orders > Inventory**.
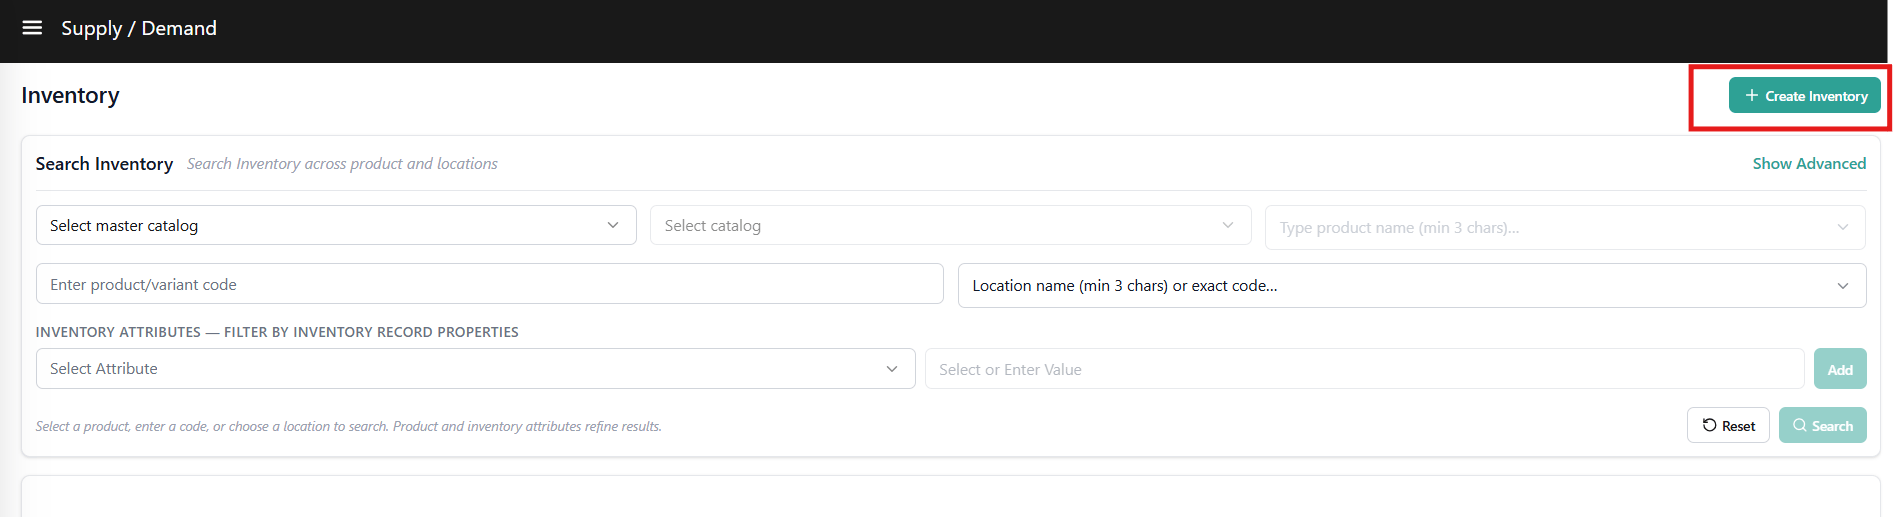
2. Click **+ Create Inventory**. A right-side drawer opens.
If you want to set Safety Stock levels automatically upon inventory refreshes, based on criteria such as product types and location groups, you can use [Safety Stock Rules](/pages/safety-stock-rules "Safety Stock Rules").
4. Click **Save**.
1. Go to **Main > Orders > Inventory**.
2. Click **+ Create Inventory**. A right-side drawer opens.
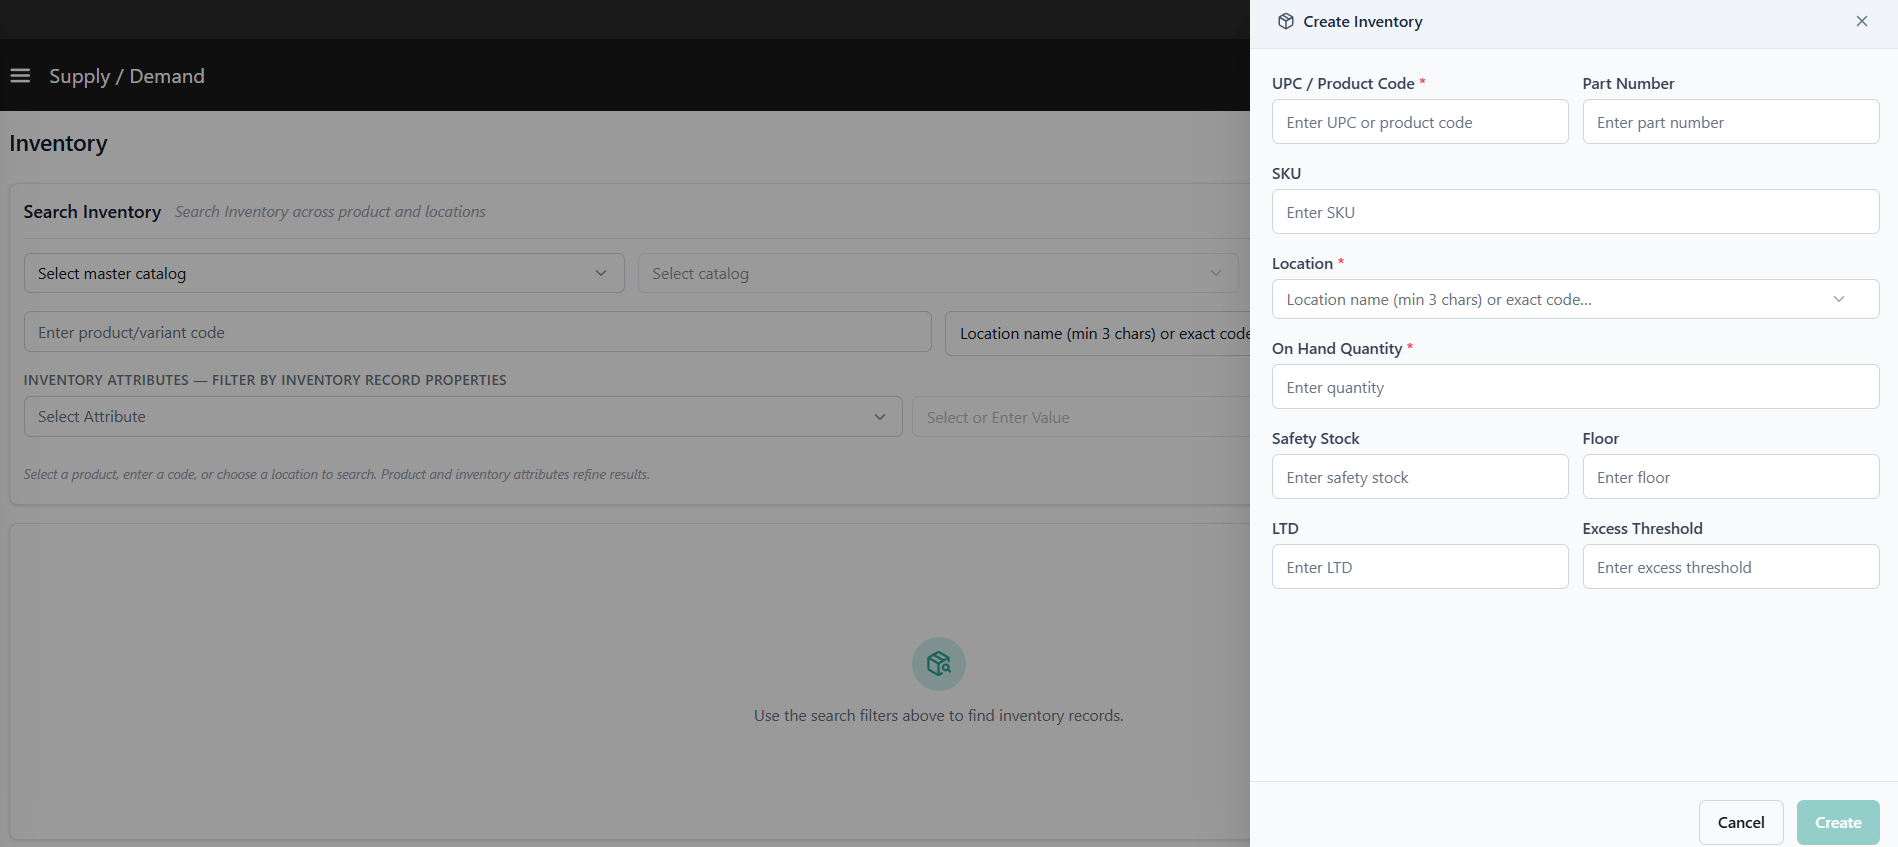 3. Enter a **UPC / Product Code** (required) and select a **Location**(required).
4. Enter **On Hand**(required) and any other applicable values: LTD, Floor, Safety Stock, Excess Inventory Threshold.
> **Available quantity:** By default, Available is computed from On Hand. If your tenant has the `isTenantEnabledToSetAvailableQuantity` flag enabled, an Available quantity field appears and can be edited directly.
5. *(Tags-enabled tenants only)* A tag selector appears. Select a tag to create the record at that tag level. Without a selection, the record is created at the UPC-location level.
3. Enter a **UPC / Product Code** (required) and select a **Location**(required).
4. Enter **On Hand**(required) and any other applicable values: LTD, Floor, Safety Stock, Excess Inventory Threshold.
> **Available quantity:** By default, Available is computed from On Hand. If your tenant has the `isTenantEnabledToSetAvailableQuantity` flag enabled, an Available quantity field appears and can be edited directly.
5. *(Tags-enabled tenants only)* A tag selector appears. Select a tag to create the record at that tag level. Without a selection, the record is created at the UPC-location level.
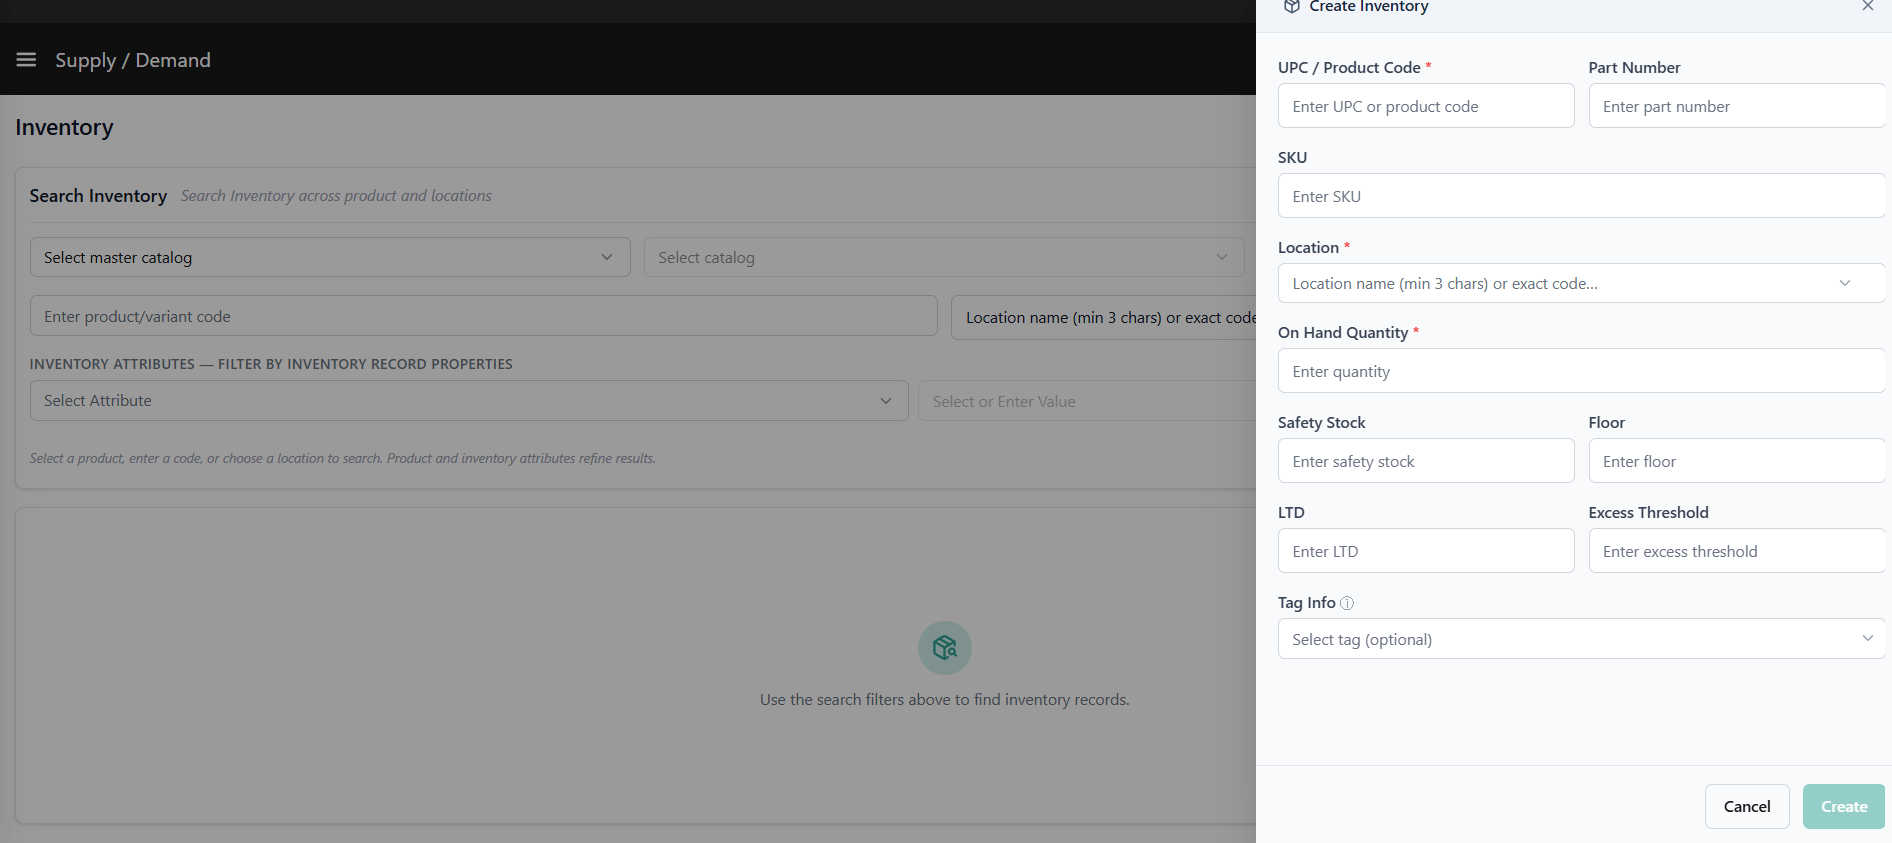 6. *(Granular-enabled tenants only)* [Granular fields](/pages/granular-inventory-fields) appear: SKU, Lot Code, Date, Condition, Serial No. These are optional unless your configuration requires them. At max you can add 10 granular records.
**Note:** Serial No: On Hand cannot exceed 1 when a Serial No is entered. Condition: Appears as a dropdown only when values exist in Settings > Condition Availability
6. *(Granular-enabled tenants only)* [Granular fields](/pages/granular-inventory-fields) appear: SKU, Lot Code, Date, Condition, Serial No. These are optional unless your configuration requires them. At max you can add 10 granular records.
**Note:** Serial No: On Hand cannot exceed 1 when a Serial No is entered. Condition: Appears as a dropdown only when values exist in Settings > Condition Availability
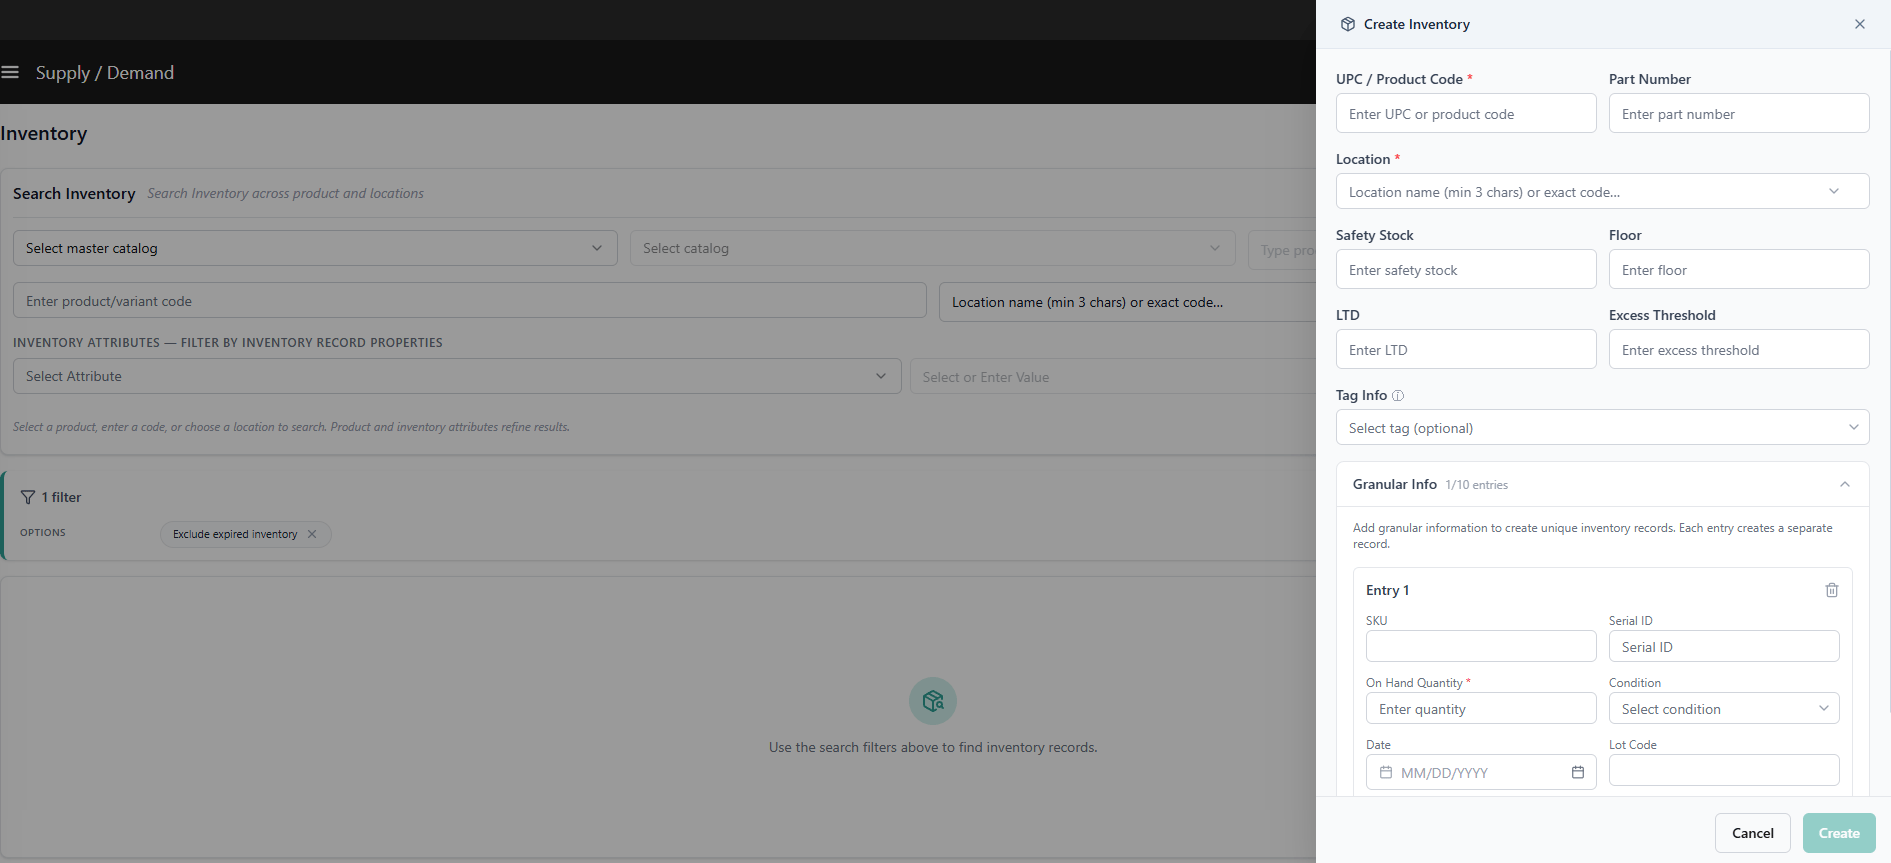 7. Click **Save**.
## Adjust Inventory Quantities
**Note:** The Inventory UI has been updated with a new look and feel and new functional changes, and has been renamed to **Supply/Demand UI**. Contact [Kibo Support](https://help.kibocommerce.com/) to opt in and begin using it. All sandbox tenants will receive the new UI on July 21. Select the tab below based on which UI your tenant is currently using.
You can adjust the On Hand, LTD, Floor, Safety Stock and Excess Inventory Threshold quantity of existing inventory records at any time via the Inventory UI. You can also update inventory quantities via the [Refresh](/api-reference/modifyinventory/refresh) and [Adjust](/api-reference/modifyinventory/adjust) APIs or [inventory import process](/pages/inventory-import-file) instead.
1. Go to **Main** > **Orders** > **Inventory.**
2. Either select the **Location Name** from the drop-down menu or enter a **Product Code** to view inventory levels.
3. Expand the actions menu on the far right of an inventory row and click **Edit**. This will make the fields editable for you to enter a new quantity.
* Note that if the inventory record includes [granular fields](/pages/granular-inventory-fields "Granular Inventory Fields") or [tagged inventory](/pages/inventory-segmentation-overview "Inventory Segmentation Overview"), the total cannot be edited at the top level. You must update the quantity for a specific granular field or tag instead.
7. Click **Save**.
## Adjust Inventory Quantities
**Note:** The Inventory UI has been updated with a new look and feel and new functional changes, and has been renamed to **Supply/Demand UI**. Contact [Kibo Support](https://help.kibocommerce.com/) to opt in and begin using it. All sandbox tenants will receive the new UI on July 21. Select the tab below based on which UI your tenant is currently using.
You can adjust the On Hand, LTD, Floor, Safety Stock and Excess Inventory Threshold quantity of existing inventory records at any time via the Inventory UI. You can also update inventory quantities via the [Refresh](/api-reference/modifyinventory/refresh) and [Adjust](/api-reference/modifyinventory/adjust) APIs or [inventory import process](/pages/inventory-import-file) instead.
1. Go to **Main** > **Orders** > **Inventory.**
2. Either select the **Location Name** from the drop-down menu or enter a **Product Code** to view inventory levels.
3. Expand the actions menu on the far right of an inventory row and click **Edit**. This will make the fields editable for you to enter a new quantity.
* Note that if the inventory record includes [granular fields](/pages/granular-inventory-fields "Granular Inventory Fields") or [tagged inventory](/pages/inventory-segmentation-overview "Inventory Segmentation Overview"), the total cannot be edited at the top level. You must update the quantity for a specific granular field or tag instead. 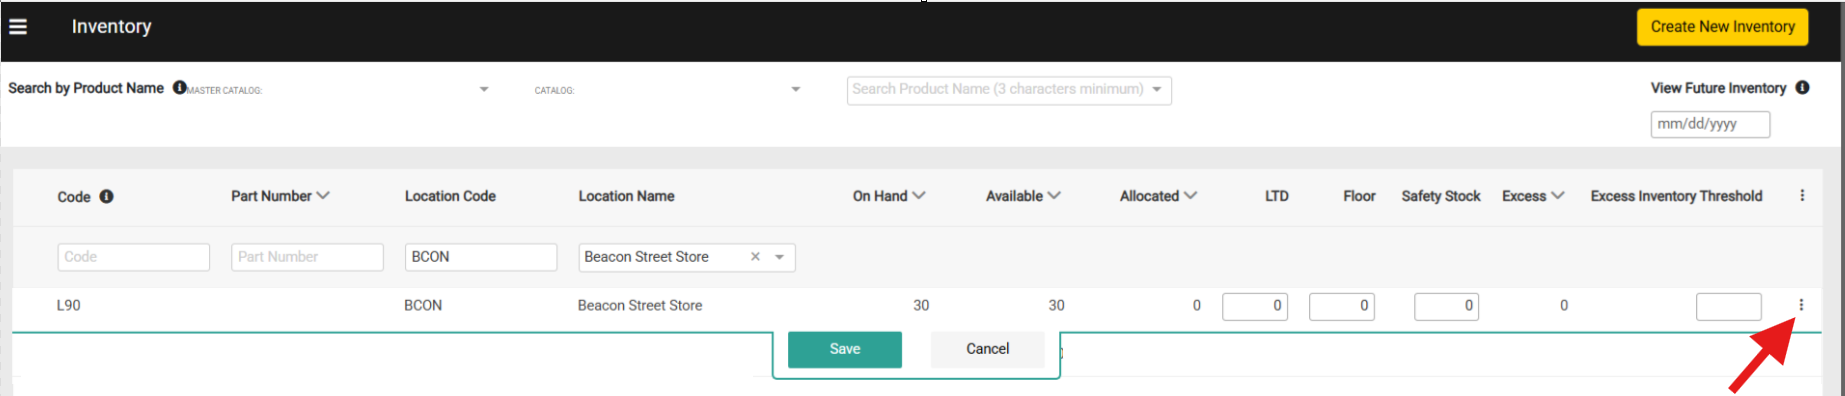 4. Click **Save**.
Click **Delete** in the actions menu if you want to completely remove a record instead. If the inventory record includes granular fields or segmented tags, they will be removed as well.
**View a record**
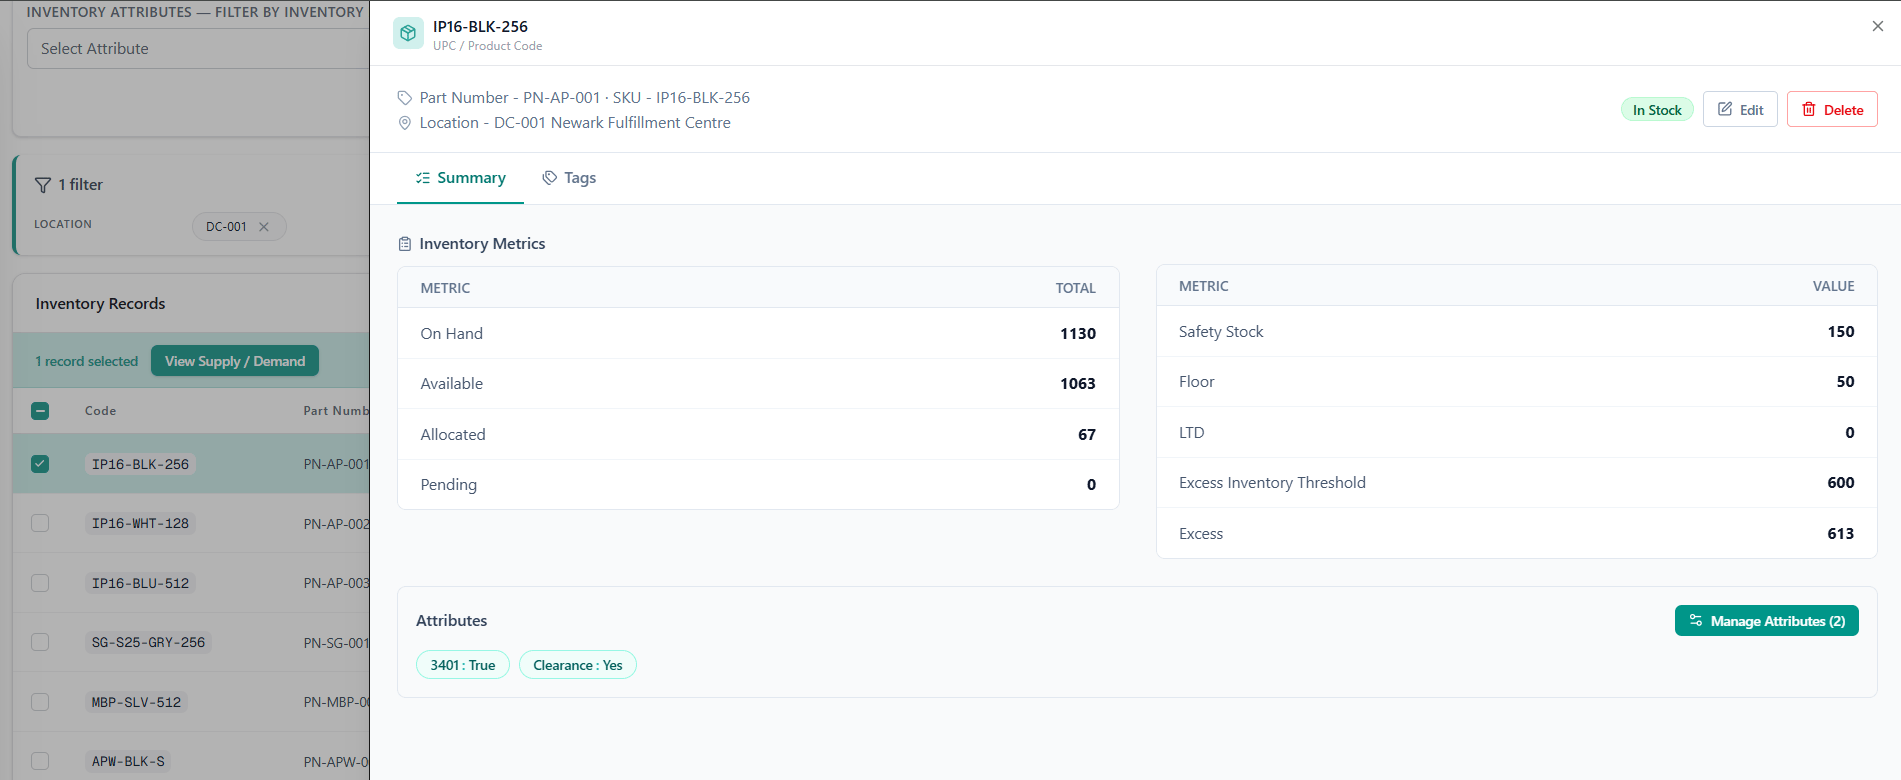
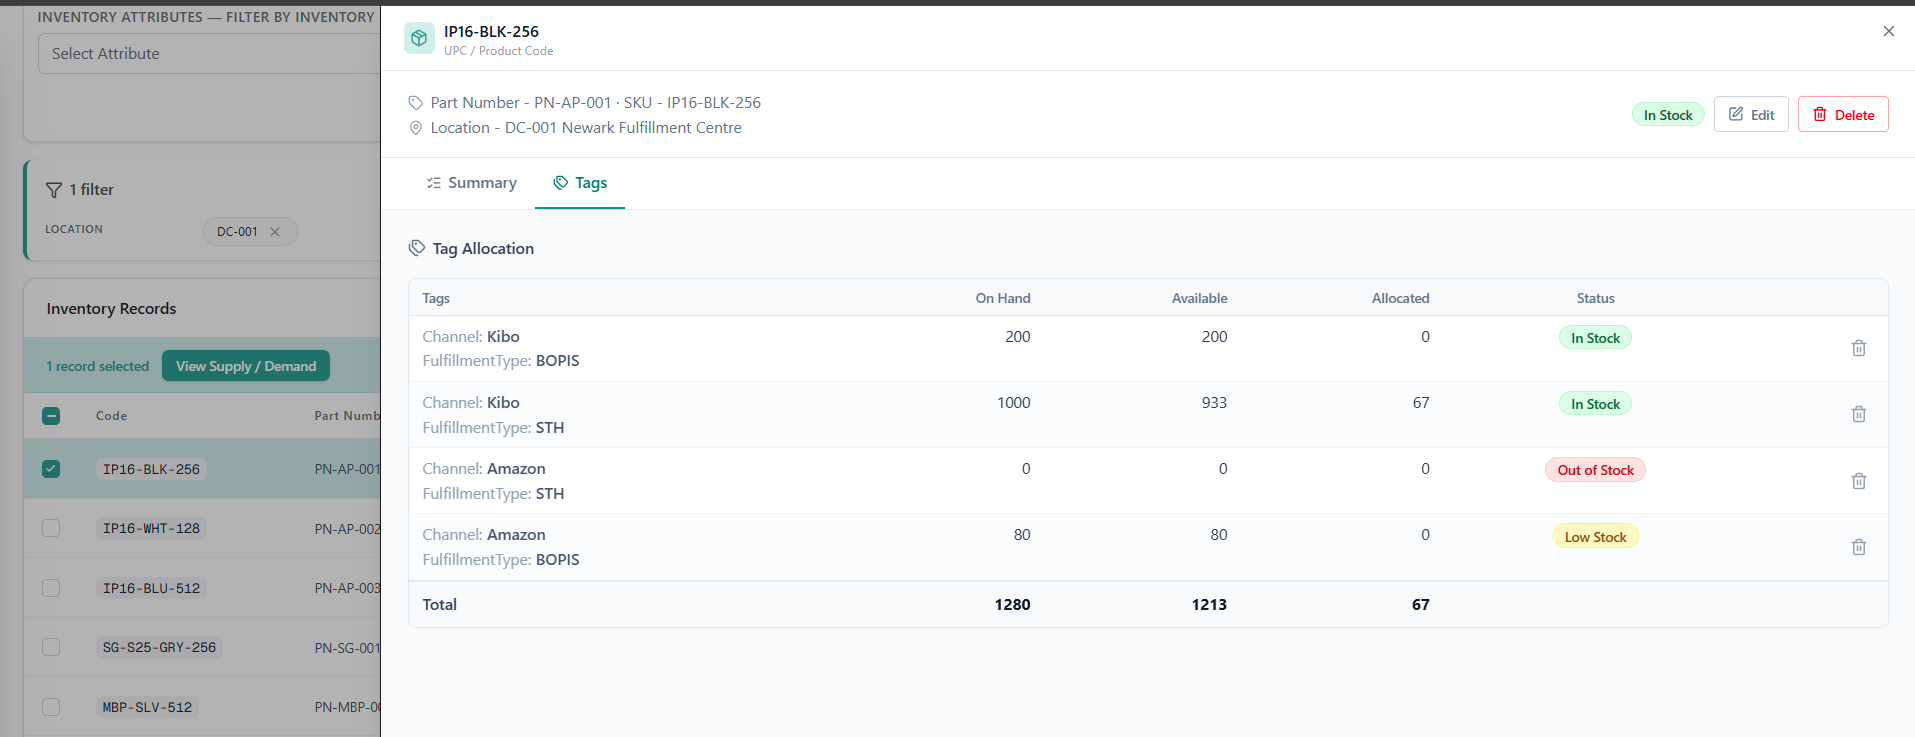
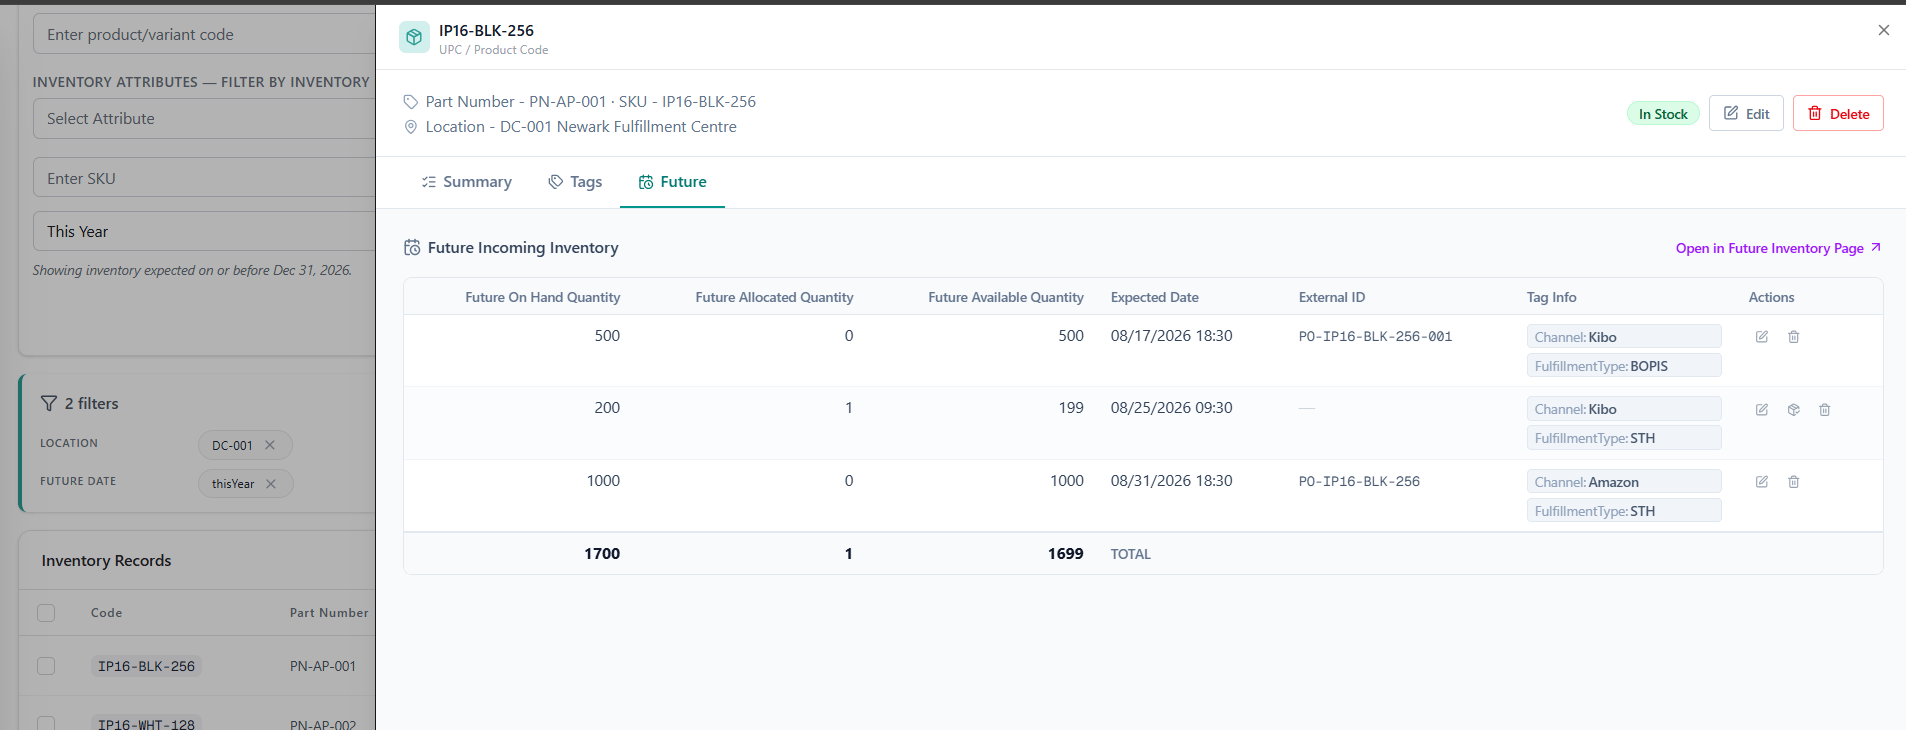
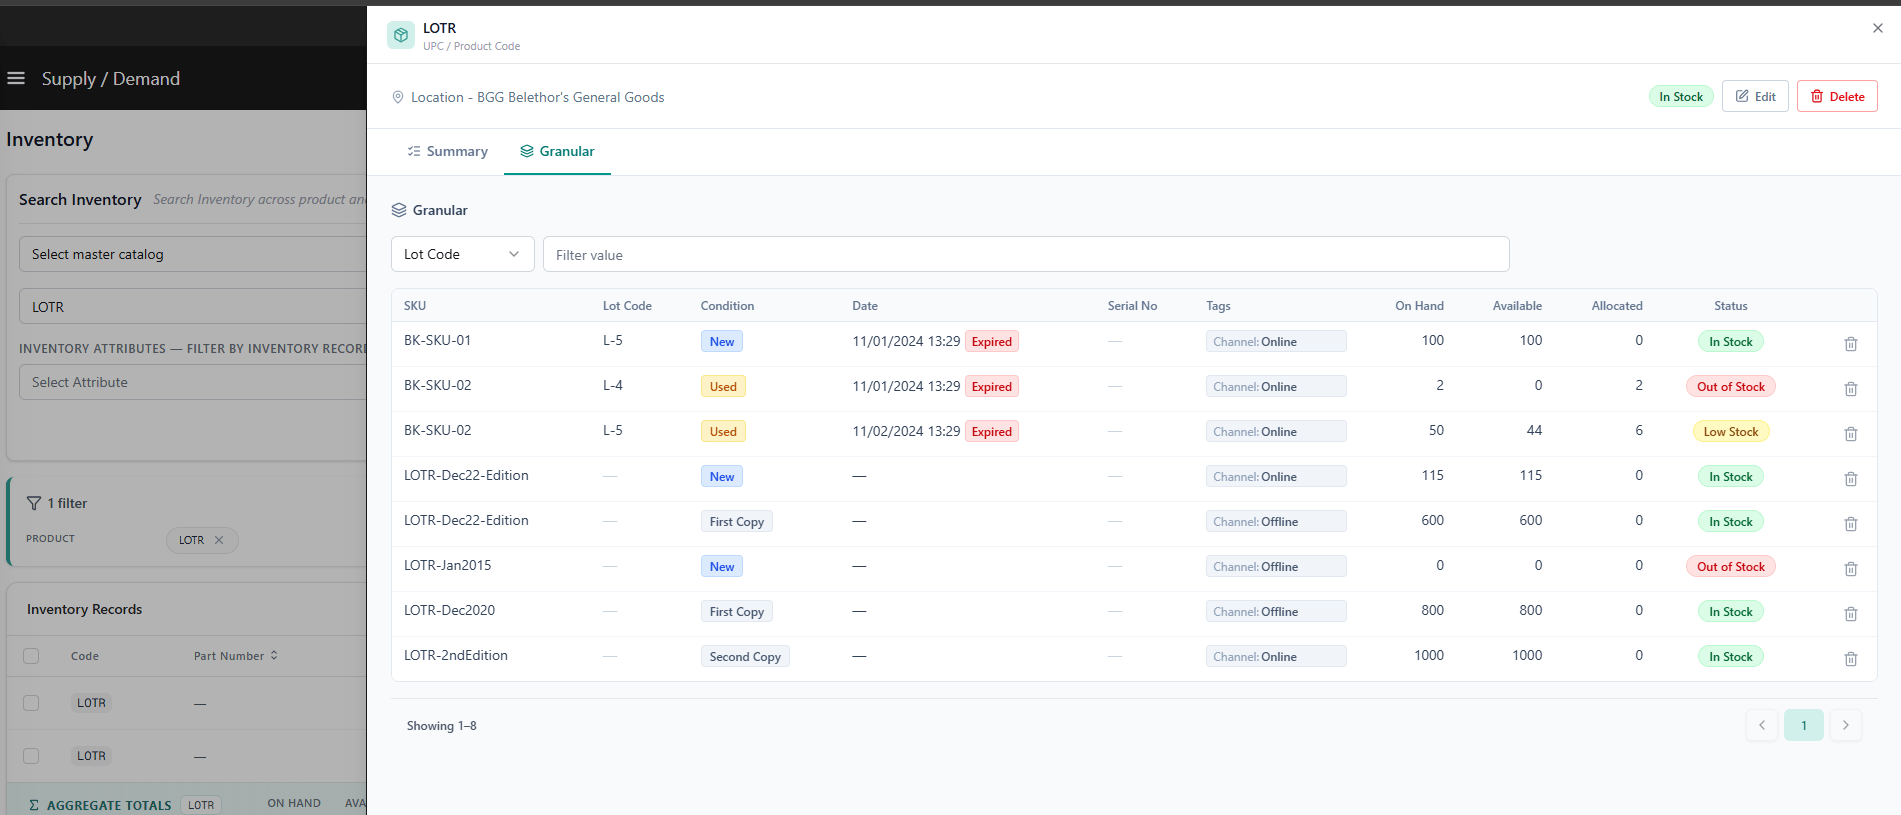
Click **View** on any row (or anywhere on the row) to open the read-only drawer. Fields are organized into tabs:
* **Summary tab** — shows all available Inventory metrics like On Hand, Available, Allocated, Pending, Safety Stock, Floor, LTD, Excess Inventory Threshold, Excess.
* **Tags tab** — per-tag quantities (shown when Tags are enabled)
* **Granular tab** — individual granular records (shown when Granular Inventory is enabled)
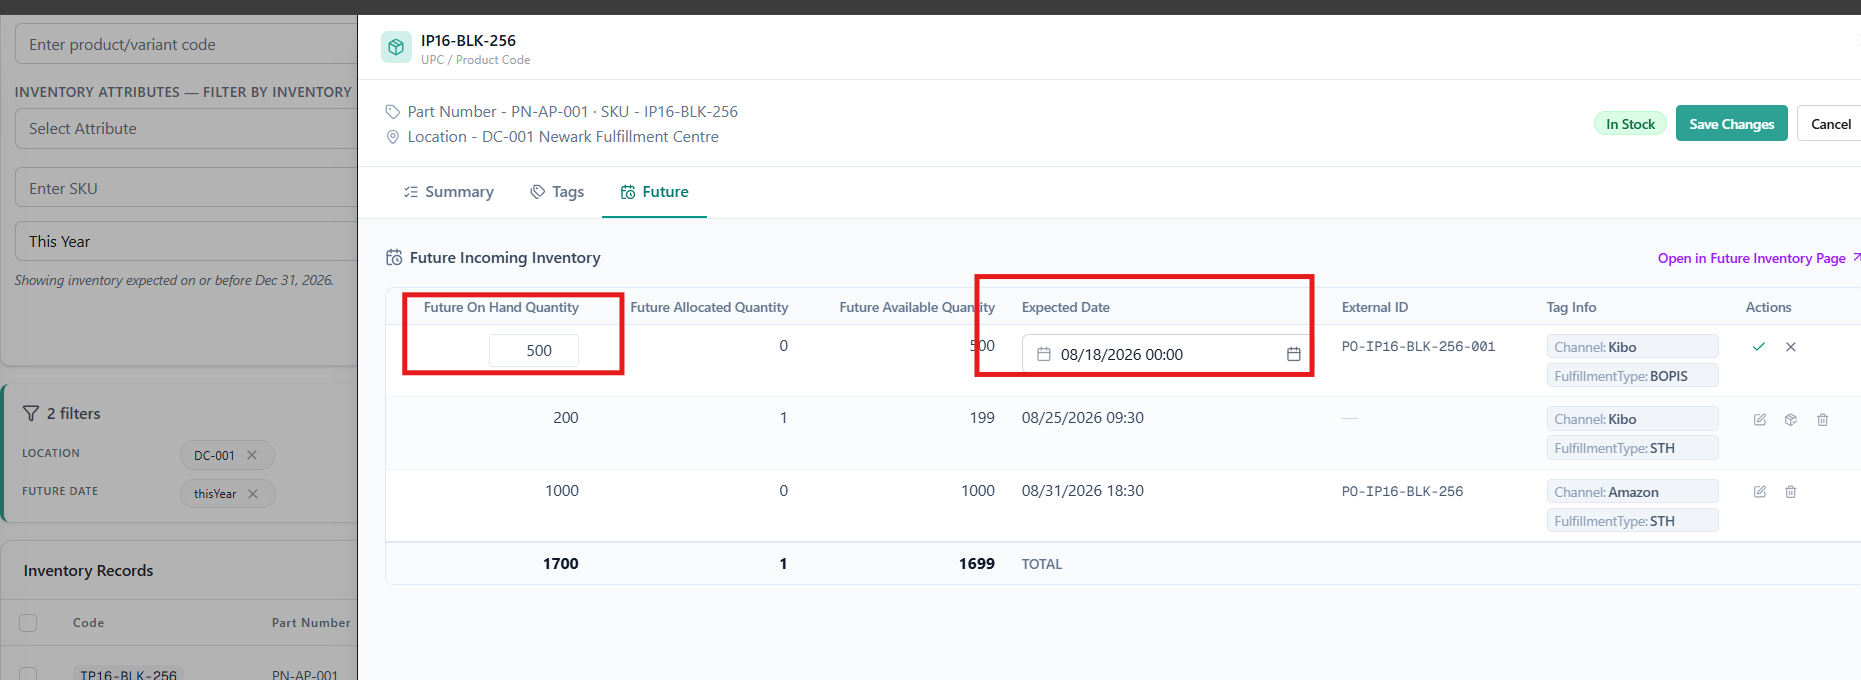
* **Future tab** — future inventory for this product-location upto the future Date range selected in search section, with a link to open the Future Inventory page with filters pre-populated
4. Click **Save**.
Click **Delete** in the actions menu if you want to completely remove a record instead. If the inventory record includes granular fields or segmented tags, they will be removed as well.
**View a record**
Click **View** on any row (or anywhere on the row) to open the read-only drawer. Fields are organized into tabs:
* **Summary tab** — shows all available Inventory metrics like On Hand, Available, Allocated, Pending, Safety Stock, Floor, LTD, Excess Inventory Threshold, Excess.
* **Tags tab** — per-tag quantities (shown when Tags are enabled)
* **Granular tab** — individual granular records (shown when Granular Inventory is enabled)
* **Future tab** — future inventory for this product-location upto the future Date range selected in search section, with a link to open the Future Inventory page with filters pre-populated
 **Edit a record**
You can adjust the On Hand, LTD, Floor, Safety Stock and Excess Inventory Threshold quantity of existing inventory records at any time via the Inventory UI. You can also update inventory quantities via the [Refresh](/api-reference/modifyinventory/refresh) and [Adjust](/api-reference/modifyinventory/adjust) APIs or [inventory import process](/pages/inventory-import-file) instead. Click **Edit** on any inventory record row. Editable fields depend on tenant configuration:
| Tenant setup | What's editable |
| :------------------- | :------------------------------------------------------------------------------------------------ |
| No tags, no granular | On Hand, LTD, Floor, Safety Stock, Excess Inventory Threshold, inventory attributes |
| Tags enabled | Quantity fields per tag (inside Tags tab); LTD, Floor, Safety Stock at UPC-location level |
| Granular enabled | On Hand per granular record (inside Granular tab); LTD, Floor, Safety Stock at UPC-location level |
**Edit a record**
You can adjust the On Hand, LTD, Floor, Safety Stock and Excess Inventory Threshold quantity of existing inventory records at any time via the Inventory UI. You can also update inventory quantities via the [Refresh](/api-reference/modifyinventory/refresh) and [Adjust](/api-reference/modifyinventory/adjust) APIs or [inventory import process](/pages/inventory-import-file) instead. Click **Edit** on any inventory record row. Editable fields depend on tenant configuration:
| Tenant setup | What's editable |
| :------------------- | :------------------------------------------------------------------------------------------------ |
| No tags, no granular | On Hand, LTD, Floor, Safety Stock, Excess Inventory Threshold, inventory attributes |
| Tags enabled | Quantity fields per tag (inside Tags tab); LTD, Floor, Safety Stock at UPC-location level |
| Granular enabled | On Hand per granular record (inside Granular tab); LTD, Floor, Safety Stock at UPC-location level |
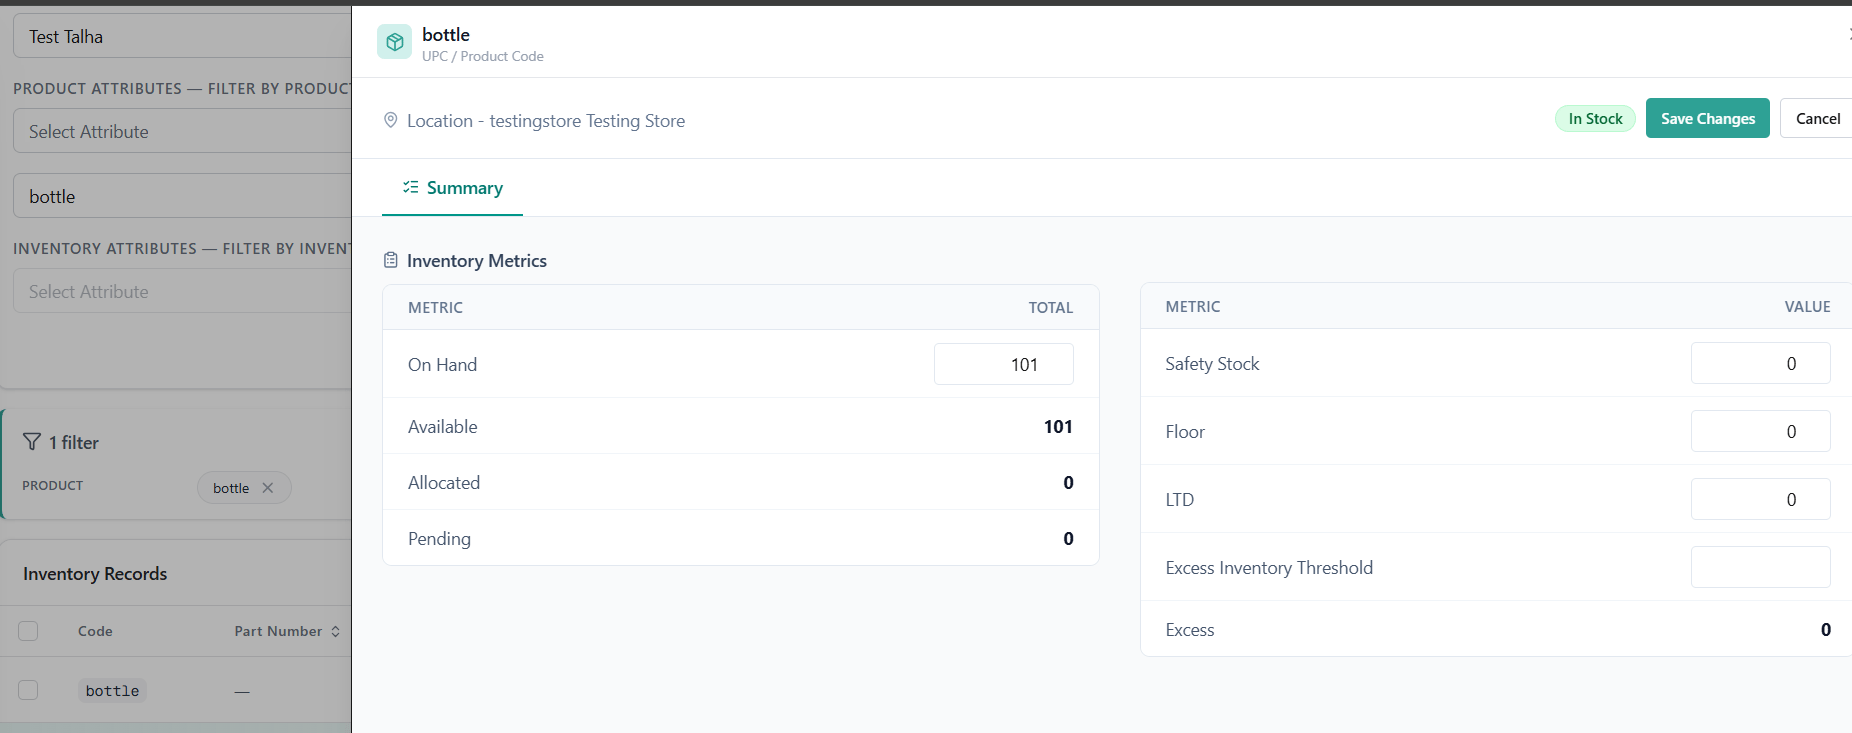
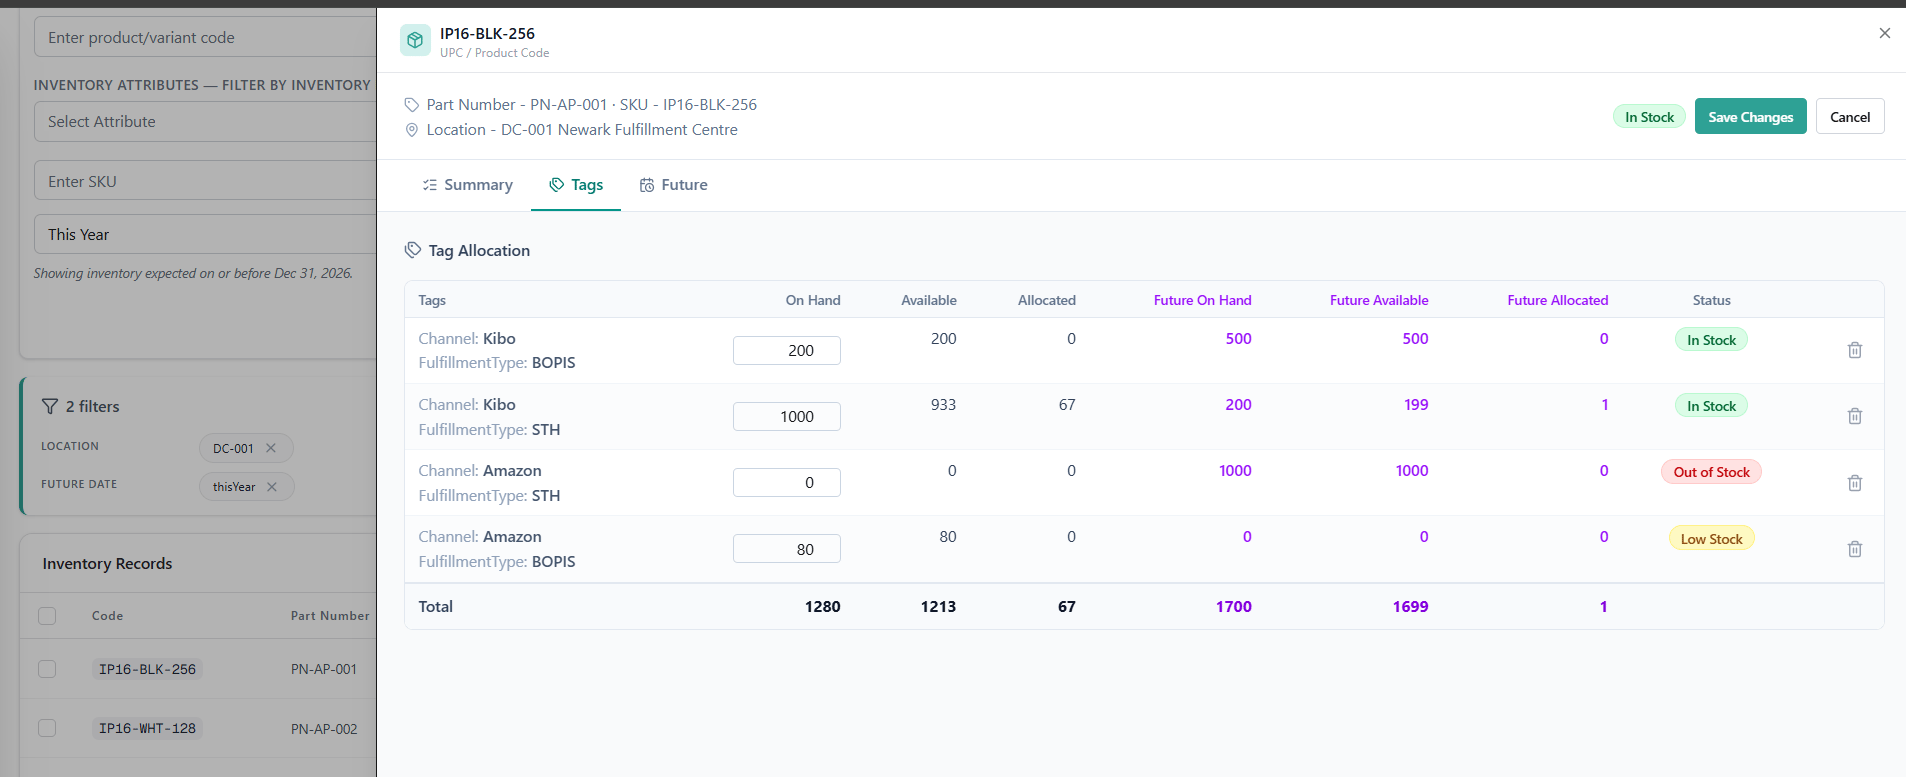
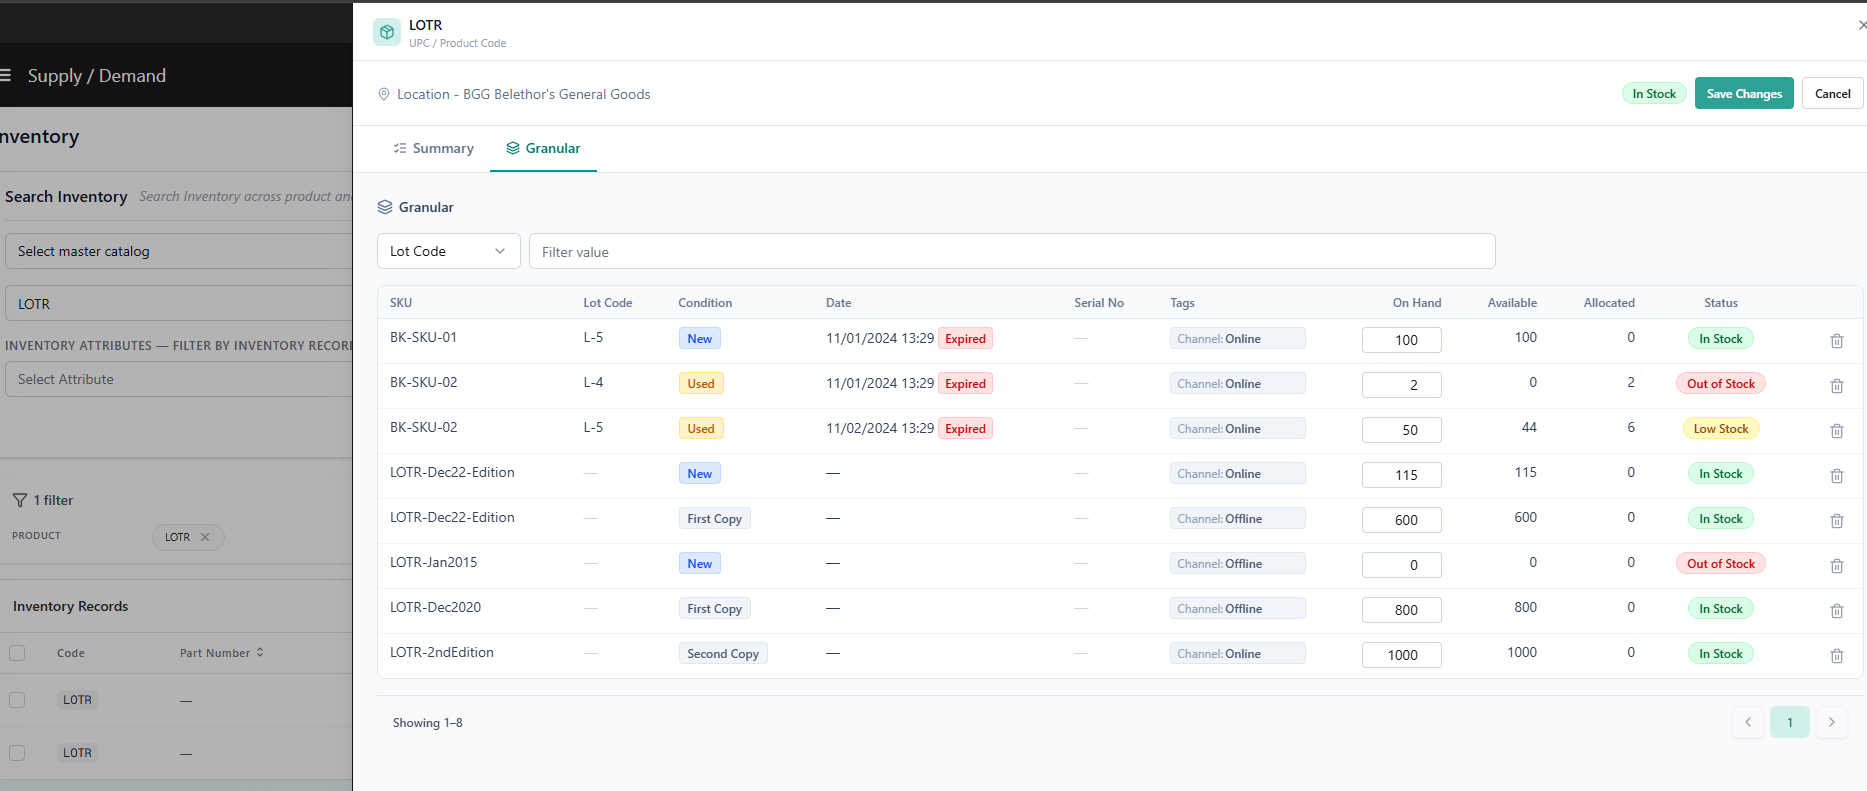 If future inventory is searched - Future Tab allows to edit individual future inventory record.
 Click **Save** to apply changes.
**Delete a record**
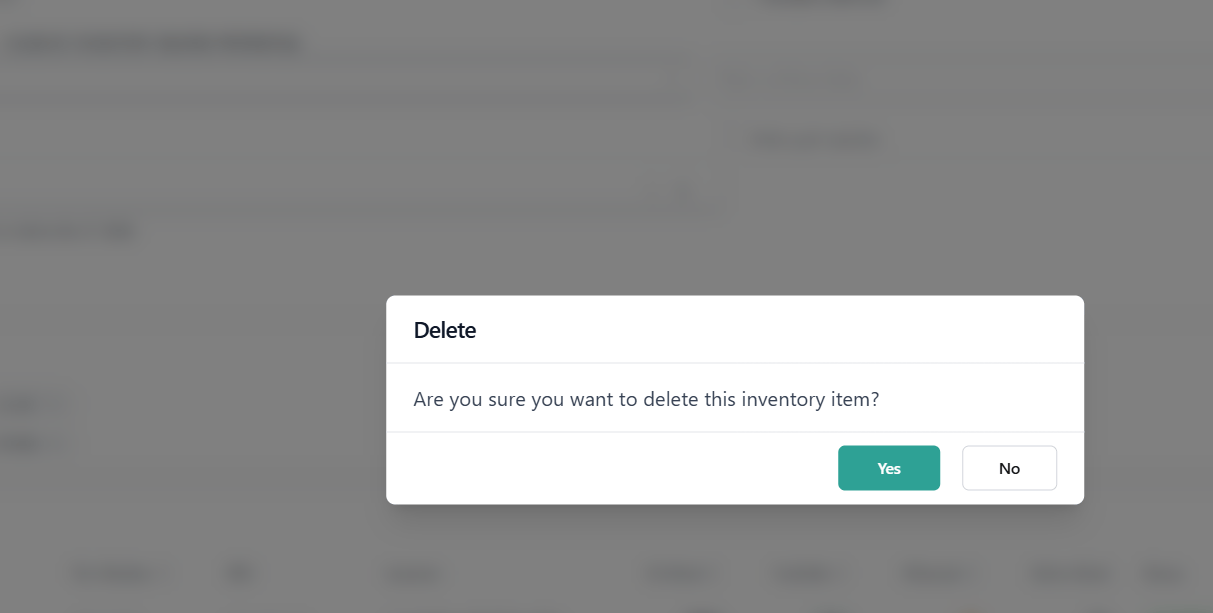
Click **Delete** on a row. Confirm when prompted. This removes the entire product-location record.
Click **Save** to apply changes.
**Delete a record**
Click **Delete** on a row. Confirm when prompted. This removes the entire product-location record.
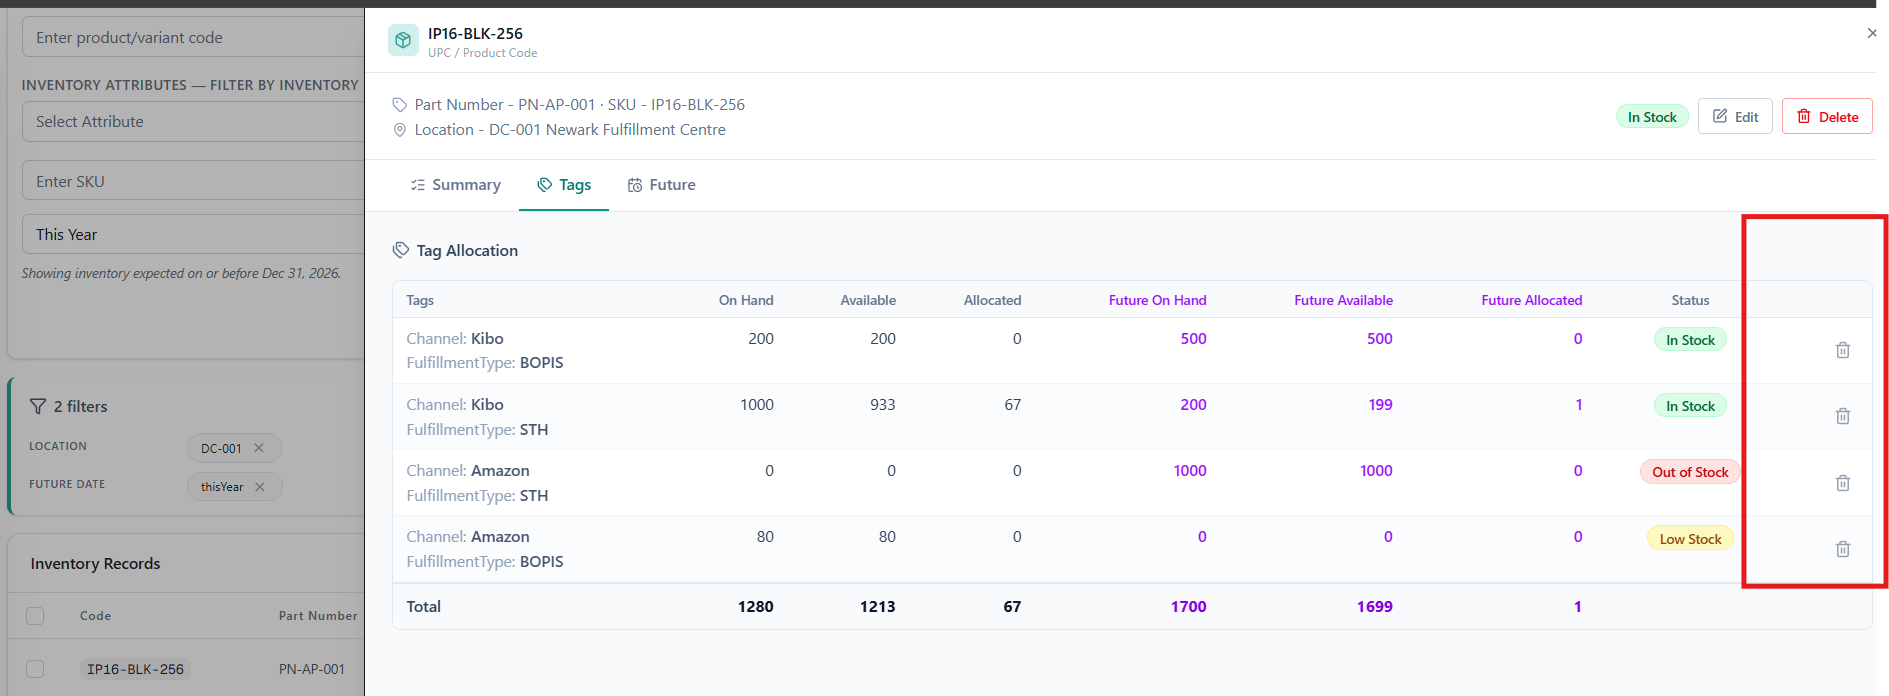
 *Delete at tag level:* Open the Edit drawer → Tags tab → click the delete icon on the target tag row. Removes only that tag, not the full product-location record.
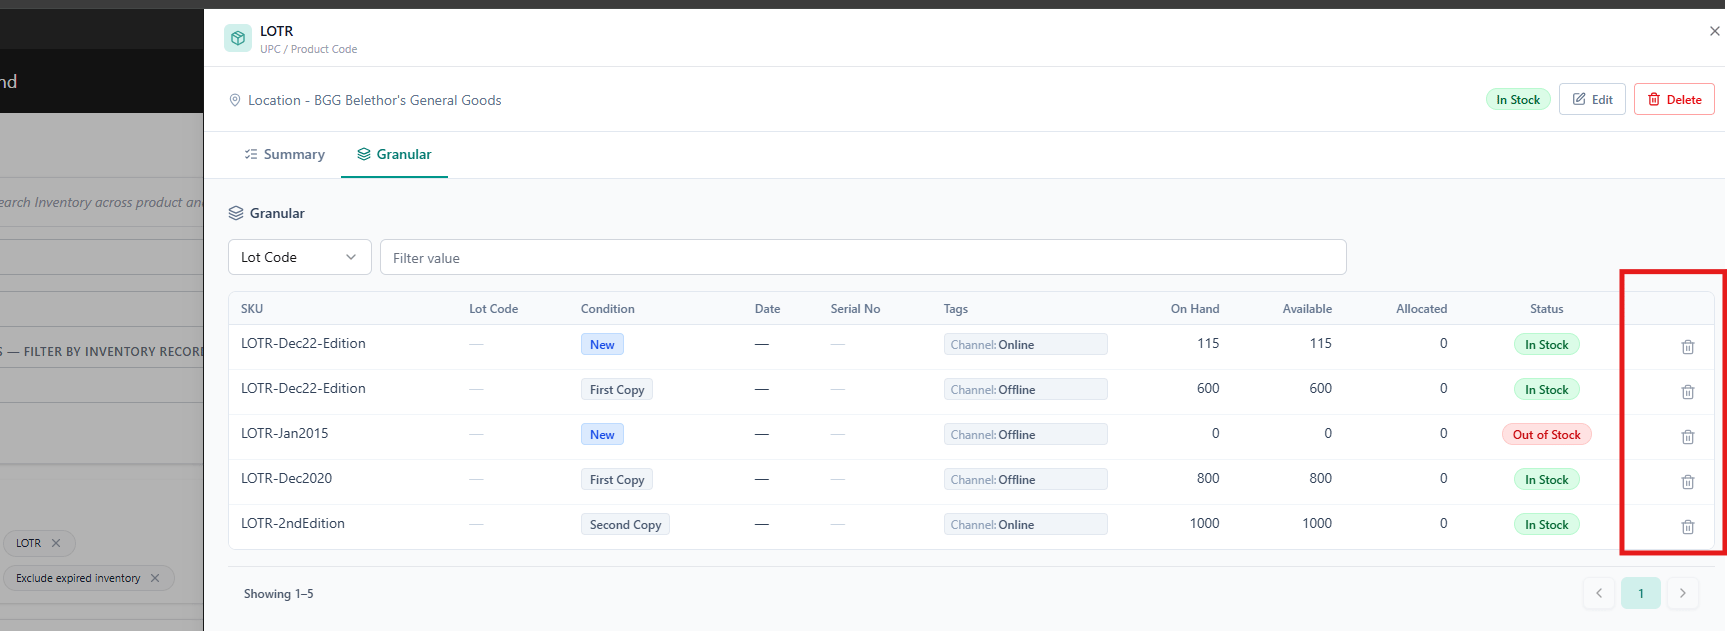
 *Delete at granular level:* Open the Edit drawer → Granular tab → click the delete icon on the target granular row.
 By default, you can only update On Hand quantities and the system will calculate the appropriate Available amount. If you want to change this behavior so that you can directly edit the Available inventory value, contact [Kibo Support](https://help.kibocommerce.com/) to update your tenant configurations.