> ## Documentation Index
> Fetch the complete documentation index at: https://docs.kibocommerce.com/llms.txt
> Use this file to discover all available pages before exploring further.
# View Inventory Segments
Segmented inventory is displayed in the Inventory UI and Inventory API data, and you can manage the inventory tags of individual order items from the Orders UI.
Learn about inventory management fundamentals
See the Inventory API documentation for programmatic access
Learn how to configure and manage inventory segments
Learn about inventory management fundamentals
See the Inventory API documentation for programmatic access
Learn how to configure and manage inventory segments
## Inventory UI
**Note:** The Inventory UI has been updated with a new look and feel and new functional changes, and has been renamed to **Supply/Demand UI**. Contact [Kibo Support](https://help.kibocommerce.com/) to opt in and begin using it. All sandbox tenants will receive the new UI on July 21. Select the tab below based on which UI your tenant is currently using.
Expanding a row in the main Inventory table will reveal its tags and the portions of the total quantities that has been set for each segment of tag values. As shown earlier, the On Hand, Available, and Allocated values add up to the total quantity for the inventory record.
If inventory is out of stock (in other words, if the available inventory is 0) at a particular location, then its row will be highlighted red. If available inventory is less than the safety stock but is not yet 0, then it will be highlighted yellow to warn that it will be going out of stock soon.
The safety stock is set at the overall record level, and all segments within that record are compared against that value. If only one segment is out of stock or its available quantity is below the safety stock value, then only that row will be highlighted.
 In the new UI, segmented inventory is viewed through the View/Edit drawer rather than by expanding rows in the table.
Go to **Main > Orders > Inventory** and search for the product-location you want to inspect. Click **View** or **Edit** on any row to open the drawer, then select the **Tags tab**.
The Tags tab shows per-tag quantities:
| Column | Description |
| :-------- | :----------------------------------- |
| Tag | The tag name and value |
| On Hand | Inventory on hand for this segment |
| Available | Available inventory for this segment |
| Allocated | Allocated inventory for this segment |
In the new UI, segmented inventory is viewed through the View/Edit drawer rather than by expanding rows in the table.
Go to **Main > Orders > Inventory** and search for the product-location you want to inspect. Click **View** or **Edit** on any row to open the drawer, then select the **Tags tab**.
The Tags tab shows per-tag quantities:
| Column | Description |
| :-------- | :----------------------------------- |
| Tag | The tag name and value |
| On Hand | Inventory on hand for this segment |
| Available | Available inventory for this segment |
| Allocated | Allocated inventory for this segment |
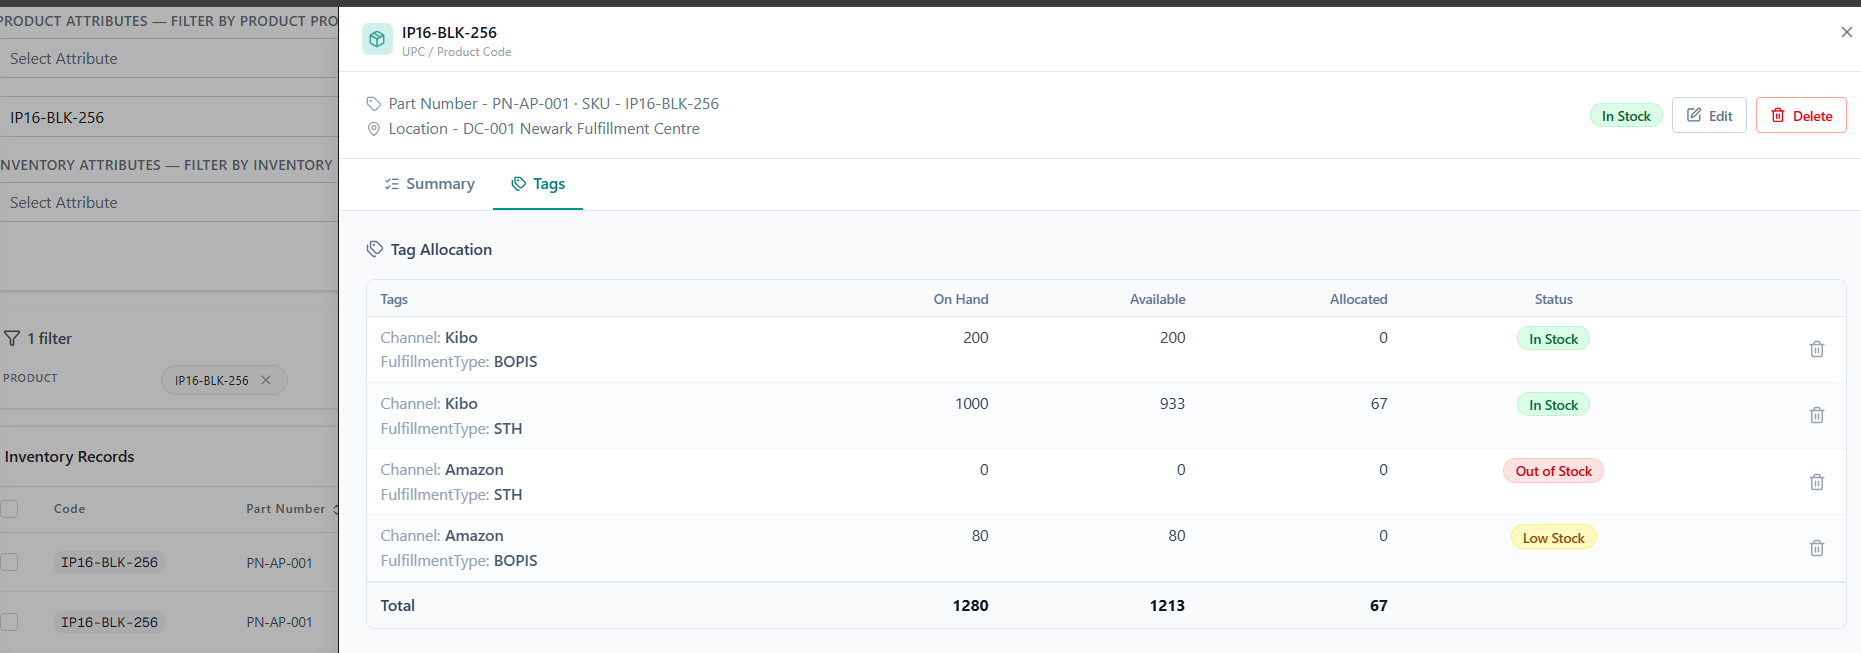 **Stock status colors**
The new UI uses four row colors at the record level instead of two:
| Color | Status | Condition |
| :----- | :----------- | :----------------------------- |
| Green | In Stock | Available ≥ safety stock |
| Yellow | Low Stock | Available \< safety stock, > 0 |
| Red | Out of Stock | Available = 0 |
| Purple | Excess | Excess quantity > 0 |
The safety stock is still set at the overall record level. Individual tag-level quantities are visible inside the Tags tab.
**Stock status colors**
The new UI uses four row colors at the record level instead of two:
| Color | Status | Condition |
| :----- | :----------- | :----------------------------- |
| Green | In Stock | Available ≥ safety stock |
| Yellow | Low Stock | Available \< safety stock, > 0 |
| Red | Out of Stock | Available = 0 |
| Purple | Excess | Excess quantity > 0 |
The safety stock is still set at the overall record level. Individual tag-level quantities are visible inside the Tags tab.
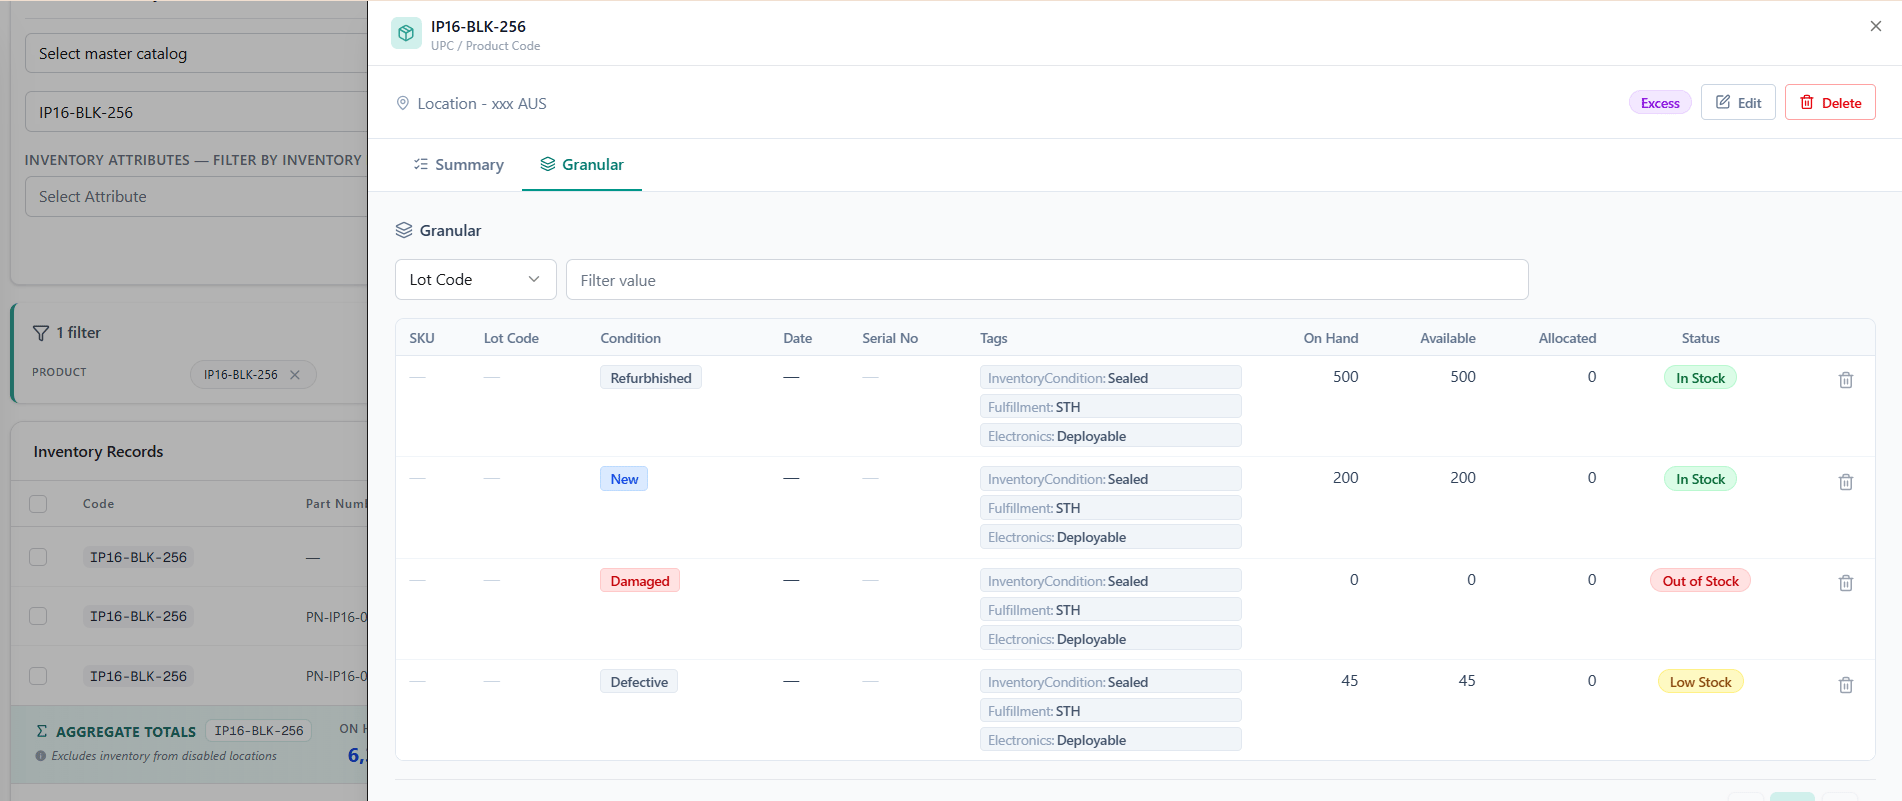 ### View Segmented Future Inventory
If viewing inventory for a site that has [future inventory](/pages/future-inventory "Future Inventory") enabled as well as segmentation, the Future On Hand, Future Available, and Future Allocated levels will be displayed at the tag level while the parent record displays the sum of inventory levels across all tags.
1. Expand a parent inventory record to view its tags, which will include a breakdown of each segment's Current, Future, and Total (the sum of Current and Future) inventory levels if that product uses future inventory.
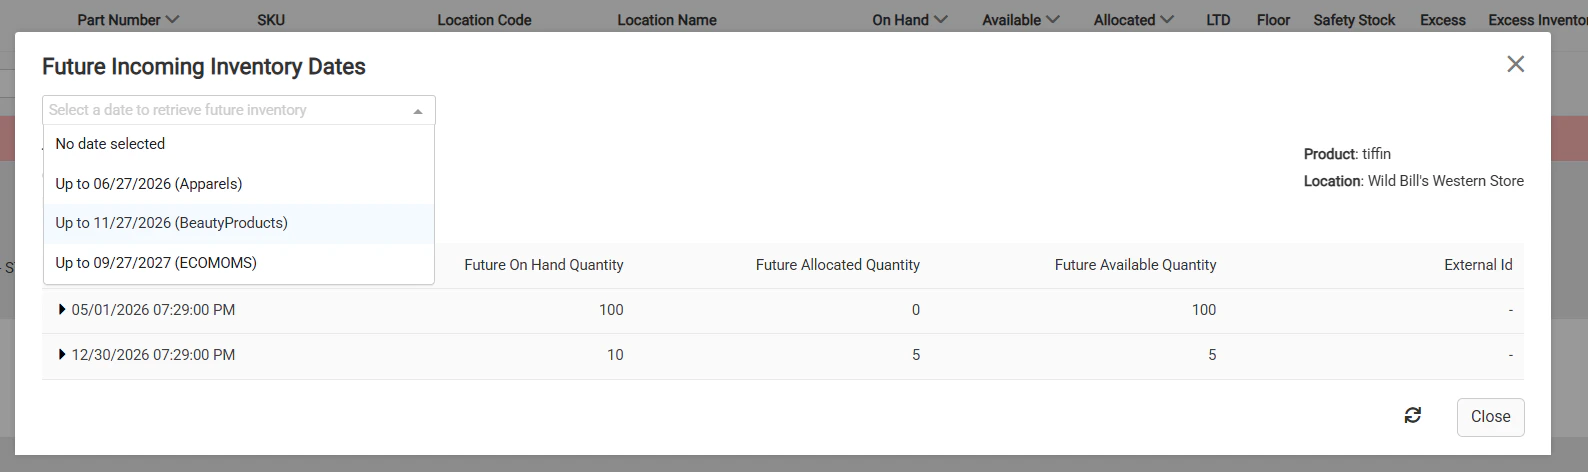
2. Click the **Future Inventory Dates** link on an individual segment. This will display a pop-up with more details about the inventory levels that are expected for that segment until the selected date.
### View Segmented Future Inventory
If viewing inventory for a site that has [future inventory](/pages/future-inventory "Future Inventory") enabled as well as segmentation, the Future On Hand, Future Available, and Future Allocated levels will be displayed at the tag level while the parent record displays the sum of inventory levels across all tags.
1. Expand a parent inventory record to view its tags, which will include a breakdown of each segment's Current, Future, and Total (the sum of Current and Future) inventory levels if that product uses future inventory.
2. Click the **Future Inventory Dates** link on an individual segment. This will display a pop-up with more details about the inventory levels that are expected for that segment until the selected date.  3. Select a date using the drop down **Select a date to retrieve future inventory**. This should be a value between the current date and the future date limit as configured in site settings per site.
 In the new UI, segmented [future inventory](/pages/future-inventory) is viewed from the Future Inventory page or Future Tab on Main Inventory Page rather than from a popup on the main inventory table.
**Option 1 — From the main Inventory page**
**Note:** The **Future tab** inside the View/Edit drawer is only visible when you have searched using a future date range filter (via Advanced Filter). Run your search with a future date range first, then open the drawer to access this tab.
1. Go to **Main > Orders > Inventory**.
2. Search for the product-location. In **Advanced Filter**, set a **Future Date Range**.
3. Click **View** or **Edit** on a row to open the drawer, then select the **Future tab**.
4. The Future tab shows Future On Hand, Future Available, and Future Allocated for this product-location, broken down by tag..
In the new UI, segmented [future inventory](/pages/future-inventory) is viewed from the Future Inventory page or Future Tab on Main Inventory Page rather than from a popup on the main inventory table.
**Option 1 — From the main Inventory page**
**Note:** The **Future tab** inside the View/Edit drawer is only visible when you have searched using a future date range filter (via Advanced Filter). Run your search with a future date range first, then open the drawer to access this tab.
1. Go to **Main > Orders > Inventory**.
2. Search for the product-location. In **Advanced Filter**, set a **Future Date Range**.
3. Click **View** or **Edit** on a row to open the drawer, then select the **Future tab**.
4. The Future tab shows Future On Hand, Future Available, and Future Allocated for this product-location, broken down by tag..
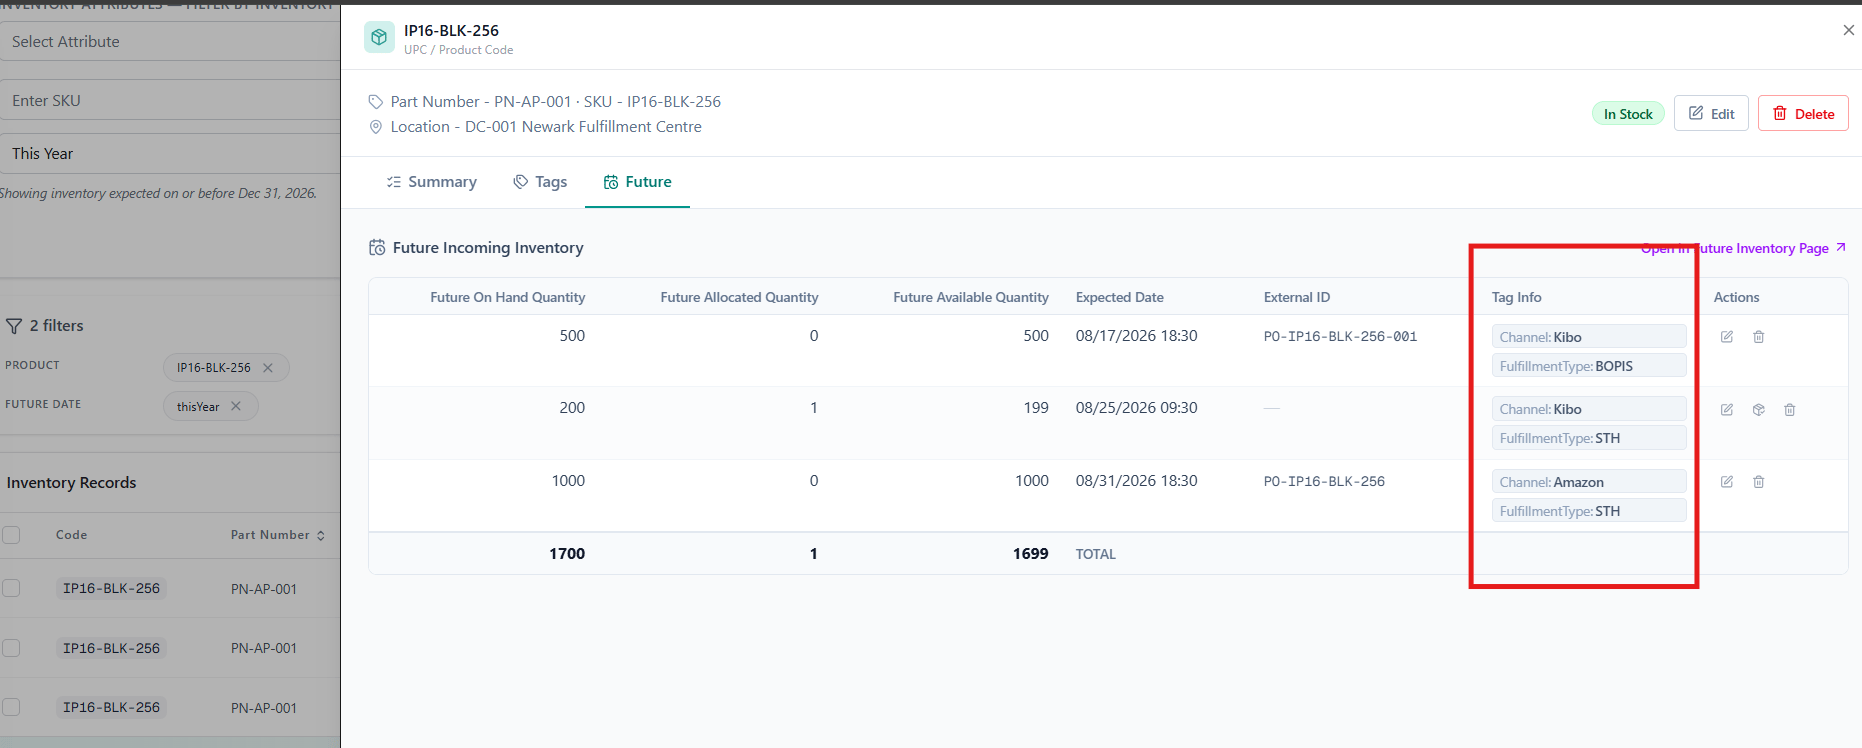 **Option 2 — From the Future Inventory page**
1. Go to **Main > Orders > Inventory > Future Inventory**.
2. Search by UPC, Location, or Future Date Range to find the records you need.
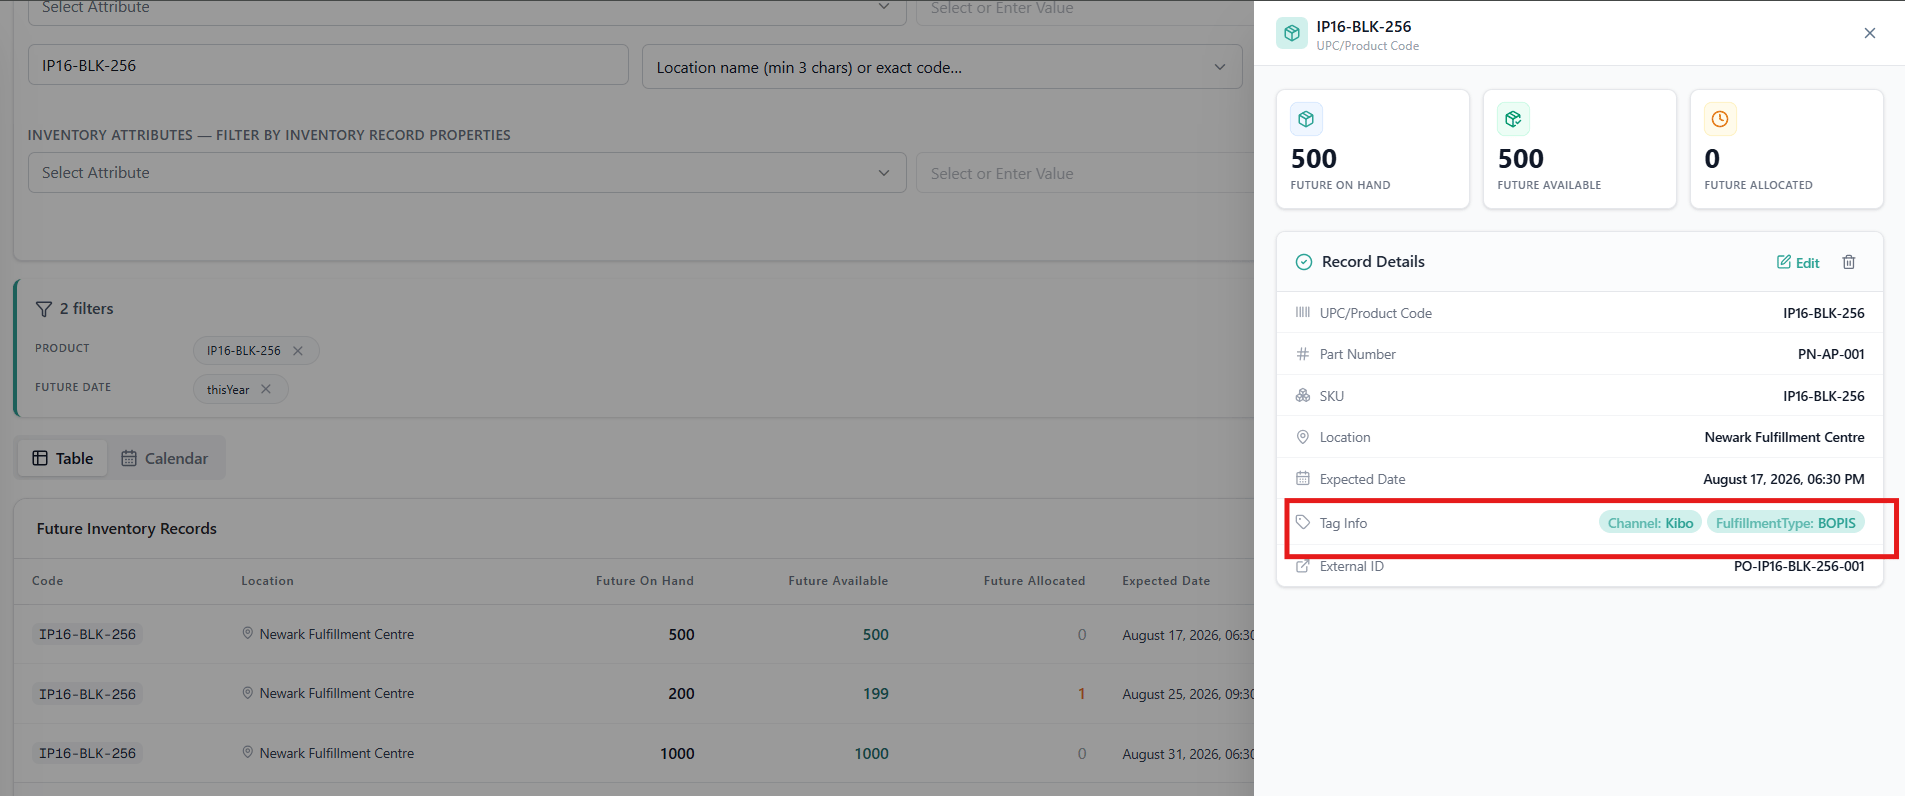
3. Click **View** on an Future Incoming Record. Tags Info for that Future Inventory Record is visible on the View Drawer.
**Option 2 — From the Future Inventory page**
1. Go to **Main > Orders > Inventory > Future Inventory**.
2. Search by UPC, Location, or Future Date Range to find the records you need.
3. Click **View** on an Future Incoming Record. Tags Info for that Future Inventory Record is visible on the View Drawer.
 ## API Responses
You can also view tagged inventory segments when [retrieving inventory data from the API](/api-reference/inventory/get-inventory-post), such as in this example response:
```text theme={null}
[
{
"locationName": "Main Warehouse",
"locationCode": "homebase",
"tenantID": 31545,
"onHand": 150,
"available": 148,
"allocated": 2,
"pending": 0,
"upc": "AD1001",
"blockAssignment": false,
"ltd": 0,
"floor": 0,
"safetyStock": 0,
"distance": 0,
"directShip": true,
"transferEnabled": true,
"pickup": true,
"countryCode": "US",
"taggedInventory": [
{
"onHand": 100,
"available": 100,
"allocated": 0,
"pending": 0,
"tags": {
"Channel": "Warehouse"
},
"futureInventory": null
},
{
"onHand": 50,
"available": 48,
"allocated": 2,
"pending": 0,
"tags": {
"Channel": "Target"
},
"futureInventory": null
}
]
}
]
```
## API Responses
You can also view tagged inventory segments when [retrieving inventory data from the API](/api-reference/inventory/get-inventory-post), such as in this example response:
```text theme={null}
[
{
"locationName": "Main Warehouse",
"locationCode": "homebase",
"tenantID": 31545,
"onHand": 150,
"available": 148,
"allocated": 2,
"pending": 0,
"upc": "AD1001",
"blockAssignment": false,
"ltd": 0,
"floor": 0,
"safetyStock": 0,
"distance": 0,
"directShip": true,
"transferEnabled": true,
"pickup": true,
"countryCode": "US",
"taggedInventory": [
{
"onHand": 100,
"available": 100,
"allocated": 0,
"pending": 0,
"tags": {
"Channel": "Warehouse"
},
"futureInventory": null
},
{
"onHand": 50,
"available": 48,
"allocated": 2,
"pending": 0,
"tags": {
"Channel": "Target"
},
"futureInventory": null
}
]
}
]
```