
Documentation Index

Fetch the complete documentation index at: https://docs.kibocommerce.com/llms.txt

Use this file to discover all available pages before exploring further.

You can calculate tax using Avalara and add your own tax engines using either API Extensions or tax calculator capability. If a user needs a service other than Avalara then the following approaches help to integrate your own tax calculator.

Approach 1: Using estimateTaxes API Extension

This approach is used after creating a new API extension application. The following steps set a tax response using the estimateTaxes API Extension:
  1. Create a new API Extension Application. Refer to the API Extension document.
  2. Use the API Extension function.
  3. The Estimate Taxes (Before) file is shown in the following code block:
    module.exports = function(context, callback) {
      var responseBody = {
        "itemTaxContexts" : [],
        "shippingTax" : 0.00,
        "handlingFeeTax" : 0.00,
        "orderTax" : 0.00,
        "taxData": { "taxPercent": 0.00 }
      };
      
      needle.get('https://example.com/taxService', (res) => {
        var taxResponse = JSON.parse(data);
        responseBody.orderTax = taxResponse.data.taxAmount
        responseBody.taxData = { "taxPercent": taxResponse.data.taxPercentage };
        var lineItem = taxOrderInfo.lineItems[0]; // assume there is at least 1 item in the order
        responseBody.itemTaxContexts.push({
          "id" : lineItem.id,
          "productCode" : lineItem.productCode,
          "quantity" : lineItem.quantity,
          "tax" : taxResponse.data.taxAmount,
          "shippingTax" : 0.0,
          "feeTotal": taxOrderInfo.handlingFee
        });
        context.response.body = responseBody;
    
        context.response.end();
        callback();
      });
    };
    
The sum of the item.itemTaxContexts elements must equal to orderTax in all the examples given below. This is a requirement for any tax integration in KCCP to be able to correctly calculate the prorated taxes when items are split across shipments.

Approach 2: Using Tax Calculator Capability

This approach helps you to add tax calculator capability through the Kibo commerce application. The following steps add a tax calculator capability:
  1. In Dev Center, navigate to Develop > Applications > Packages > Capabilities.
  2. Click Add Capability.
  3. Search for Tax Calculator in the Add Capability modal and click Ok.\ Add Capability modal with capabilities suggestions
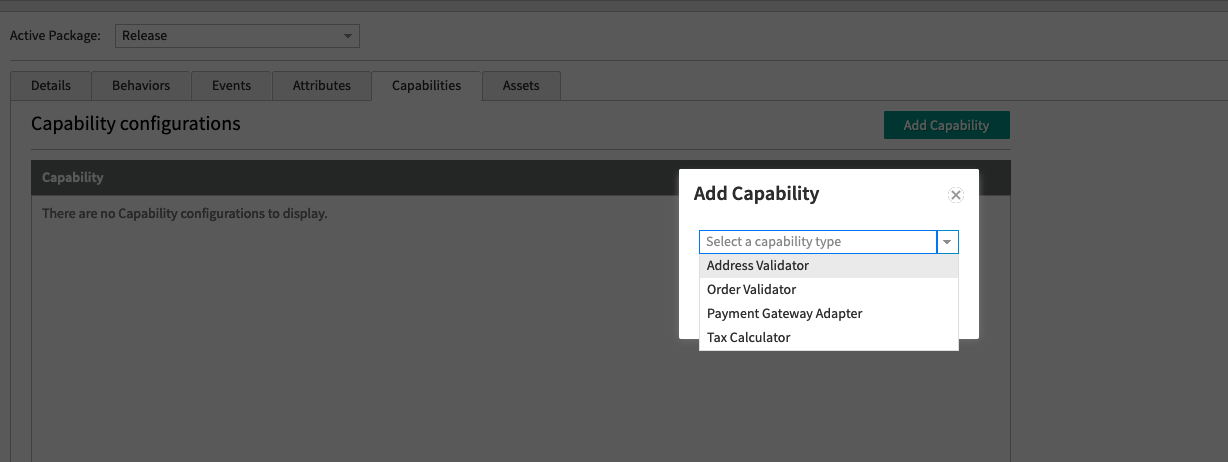
  4. Enter the external URL that receives the tax request and responds with the tax response. It will post to the URL directly and does not add any path.
  5. Select the country you want to enable it for. Press the “Enabled” toggle to enable the calculator. It might take a minute to start working.\ Application page with Enable Application toggle button at right pane.

Rest API Responses

This is what your endpoint will receive:
{
  "OrderDate": "0001-01-01T00:00:00Z",
  "TaxContext": {
    "TaxContextId": "13",
    "CustomerId": "",
    "TaxExemptId": null,
    "TaxShipping": true,
    "OriginAddress": {
      "Address1": "1835 Kramer Lane",
      "Address2": "#100",
      "Address3": null,
      "Address4": null,
      "CityOrTown": "Austin",
      "StateOrProvince": "TX",
      "PostalOrZipCode": "78758",
      "CountryCode": "US",
      "AddressType": null,
      "IsValidated": false
    },
    "DestinationAddress": {
      "Address1": "1234 Fake St",
      "Address2": "",
      "Address3": null,
      "Address4": null,
      "CityOrTown": "Houston",
      "StateOrProvince": "TX",
      "PostalOrZipCode": "12345",
      "CountryCode": "US",
      "AddressType": "Residential",
      "IsValidated": null
    }
  },
  "LineItems": [
    {
      "Id": "dbc98455f06d47359d47ae230119e28f",
      "ProductCode": "blz-1001",
      "VariantProductCode": null,
      "ProductName": "Wool Blazer",
      "ProductProperties": [
        {
          "AttributeFQN": "tenant~availability",
          "Values": [
            {
              "Value": "24-48hrs",
              "StringValue": "Usually Ships in 24 to 48 Hours"
            }
          ],
          "AttributeDetail": {
            "InputType": null,
            "ValueType": null,
            "DataType": null,
            "Name": "Availability",
            "Description": null
          },
          "IsHidden": null,
          "IsMultiValue": false
        }
      ],
      "Quantity": 1,
      "LineItemPrice": 199.0,
      "DiscountTotal": 0.0,
      "DiscountedTotal": 199.0,
      "ShippingAmount": 0.0,
      "HandlingAmount": null,
      "FeeTotal": 0.0,
      "IsTaxable": true,
      "Reason": null,
      "Data": null,
      "ProductDiscount": null,
      "ShippingDiscount": null,
      "ProductDiscounts": [],
      "ShippingDiscounts": [],
      "OriginAddress": null,
      "DestinationAddress": null
    }
  ],
  "ShippingAmount": 0.0,
  "CurrencyCode": "USD",
  "HandlingFee": 0.0,
  "OriginalDocumentCode": "13",
  "OrderId": "12e9f48b2405bf00012c953200007729",
  "OrderNumber": 13,
  "OriginalOrderDate": "2022-01-20T17:06:35.0750575Z",
  "TaxRequestType": "Order",
  "Attributes": [],
  "ShippingDiscounts": null,
  "ShippingDiscount": null,
  "OrderDiscounts": null,
  "OrderDiscount": null,
  "HandlingDiscounts": null,
  "HandlingDiscount": null,
  "ShippingMethodCode": null,
  "ShippingMethodName": null
}

Example: OrderTaxContext Response

This is what your endpoint should respond with:
{
  "ItemTaxContexts": [
    {
      "Id": "dbc98455f06d47359d47ae230119e28f",
      "ProductCode": "blz-1001",
      "Quantity": 1,
      "Tax": 1.0,
      "ShippingTax": 1.0,
      "TaxData": {
      }
    }
  ],
  "ShippingTax": 1.0,
  "HandlingFeeTax": 3.0,
  "OrderTax": 1.0
}

Example: Application

This just sends back dummy data for the specific order above, but it does work.
from flask import Flask, request, jsonify
app = Flask(__name__)

@app.route('/', methods=['GET', 'POST'])
def hello_world():
    print(request.get_data(as_text=True))
    return jsonify({
  "ItemTaxContexts": [
    {
      "Id": "dbc98455f06d47359d47ae230119e28f",
      "ProductCode": "blz-1001",
      "Quantity": 1,
      "Tax": 1.0,
      "ShippingTax": 1.0,
      "TaxData": {
      }
    }
  ],
  "ShippingTax": 1.0,
  "HandlingFeeTax": 3.0,
  "OrderTax": 1.0
})

app.run(host='0.0.0.0', port=8000)
And then in your terminal:
\# In one terminal tab
python3 app.py

# In another terminal tab
ngrok http 8000
Use the URL that ngrok gives you as your application URL. For a reference of all available platform capability types, see Application Capabilities.

Reading taxData Keys From an Order

When Kibo calculates tax, it splits the order into one or more taxable groups and records the result in the order’s taxData object (a free-form JSON object also present on checkouts, quotes, shipments, subscriptions, and returns). The top-level keys of taxData are not fixed field names — they are generated from the fulfillment characteristics of the items in each group, so the same logical shipment can produce different keys depending on how the order is configured. Integrations that read a hardcoded key such as Ship_Warehouse will fail when that key changes shape.

How taxData Keys Are Composed

Each key is built by joining the following parts with underscores:
{FulfillmentMethod}_{FulfillmentLocationCode}[_{ShippingMethodCode}]
PartDescription
FulfillmentMethodHow the group is fulfilled: Ship, Pickup, Curbside, or Digital.
FulfillmentLocationCodeThe code of the location fulfilling the group, for example Warehouse.
ShippingMethodCodeThe shipping method code for the group, for example EXPEDITE. This part is conditional — see below.

When and Why the Shipping Method Suffix Is Appended

The _{ShippingMethodCode} suffix is appended only when at least one item on the order carries an item-level shipping method (for example, orders that use split shipping or per-item delivery options). In that case, each group’s key includes the shipping method code so that items shipped by different methods from the same location are tracked as separate taxable groups, since their shipping charges and tax differ. If the order uses only a single order-level shipping method, no suffix is added — even though a shipping method exists on the order.
Order configurationResulting key
Ships from Warehouse, order-level shipping method onlyShip_Warehouse
Ships from Warehouse, item-level shipping method EXPEDITEShip_Warehouse_EXPEDITE
Picked up at WarehousePickup_Warehouse
This is why a key can change from Ship_Warehouse to Ship_Warehouse_EXPEDITE without any change to your integration: it reflects a change in how shipping methods are assigned to the order (for example, switching from order-level to item-level shipping, or introducing a new shipping method code), not a renamed platform field. The suffix value is always the shipping method code carried by the order’s items, so it varies by tenant and shipping configuration.

Handle Key Variations Defensively

Because the suffix can appear, disappear, or change value depending on the order, do not match taxData keys by exact string equality. Match by the stable prefix instead (fulfillment method and location), and degrade gracefully when no matching group is present rather than letting the action throw — an unhandled error in a downstream step (such as sending a confirmation email) can leave the order in an errored state even though it was placed successfully.
module.exports = function(context, callback) {
    try {
        var order = context.get.order();
        var taxData = order.taxData || {};

        // Match on the stable prefix so an appended shipping method code
        // (for example "_EXPEDITE") does not break the lookup.
        var prefix = 'Ship_Warehouse';
        var matchingKey = Object.keys(taxData).find(function(key) {
            return key === prefix || key.indexOf(prefix + '_') === 0;
        });

        if (!matchingKey) {
            // No matching taxable group on this order. Log and continue
            // rather than throwing and leaving the order errored downstream.
            console.warn('No taxData group found for prefix ' + prefix);
            return callback();
        }

        var taxGroup = taxData[matchingKey];
        // ... use taxGroup ...

        callback();
    } catch (err) {
        console.error(err);
        callback();
    }
};
If your integration needs to react to a specific shipping method, read the matched key’s suffix (everything after the {FulfillmentMethod}_{FulfillmentLocationCode}_ prefix) rather than assuming a single fixed value. Iterating over all keys also lets you handle orders that split into multiple taxable groups, which is common once item-level shipping is in use.